
Mỗi mùa đông, có người trong một ngôi nhà không được sưởi ấm nhìn chằm chằm vào bảng điều khiển, liếc về phía máy phát điện trong gara, và tự hỏi liệu có đủ nếu anh ta lấy một cáp và hai kẹp cá sấu. Điều đó không đủ, và lý do không phải là giấy tờ. Lý do là việc cấp điện ngược cho bảng điều khiển đặt điện áp từ máy phát điện lên phía người dùng của hệ thống, làm cho người thợ điện đến để khôi phục lưới điện có thể gặp phải. Đây là lý do tại sao có công tắc chuyển mạch, và tại sao việc lắp đặt xoay quanh một vấn đề cơ bản: làm thế nào để đảm bảo rằng phía người dùng của máy phát điện và lưới điện không bao giờ được kết nối vật lý với nhau, và làm thế nào để xác lập điều đó.
Bộ yêu cầu dưới đây dựa trên giả định rằng mạch điện được đề cập là mạch đơn pha hoạt động tại Bắc Mỹ và sử dụng máy phát điện di động hoặc dự phòng. Trình tự này khá có chủ ý; quá trình định kích thước là bước đầu tiên, vì nó ảnh hưởng đến mọi hành động khác được thực hiện sau đó, sau đó chuyển sang công việc cơ khí, rồi đến dây dẫn, trung tính và nối đất, điều này bất ngờ trở thành những quyết định quan trọng mà một số lượng đáng ngạc nhiên người lại để cho thanh tra xử lý.
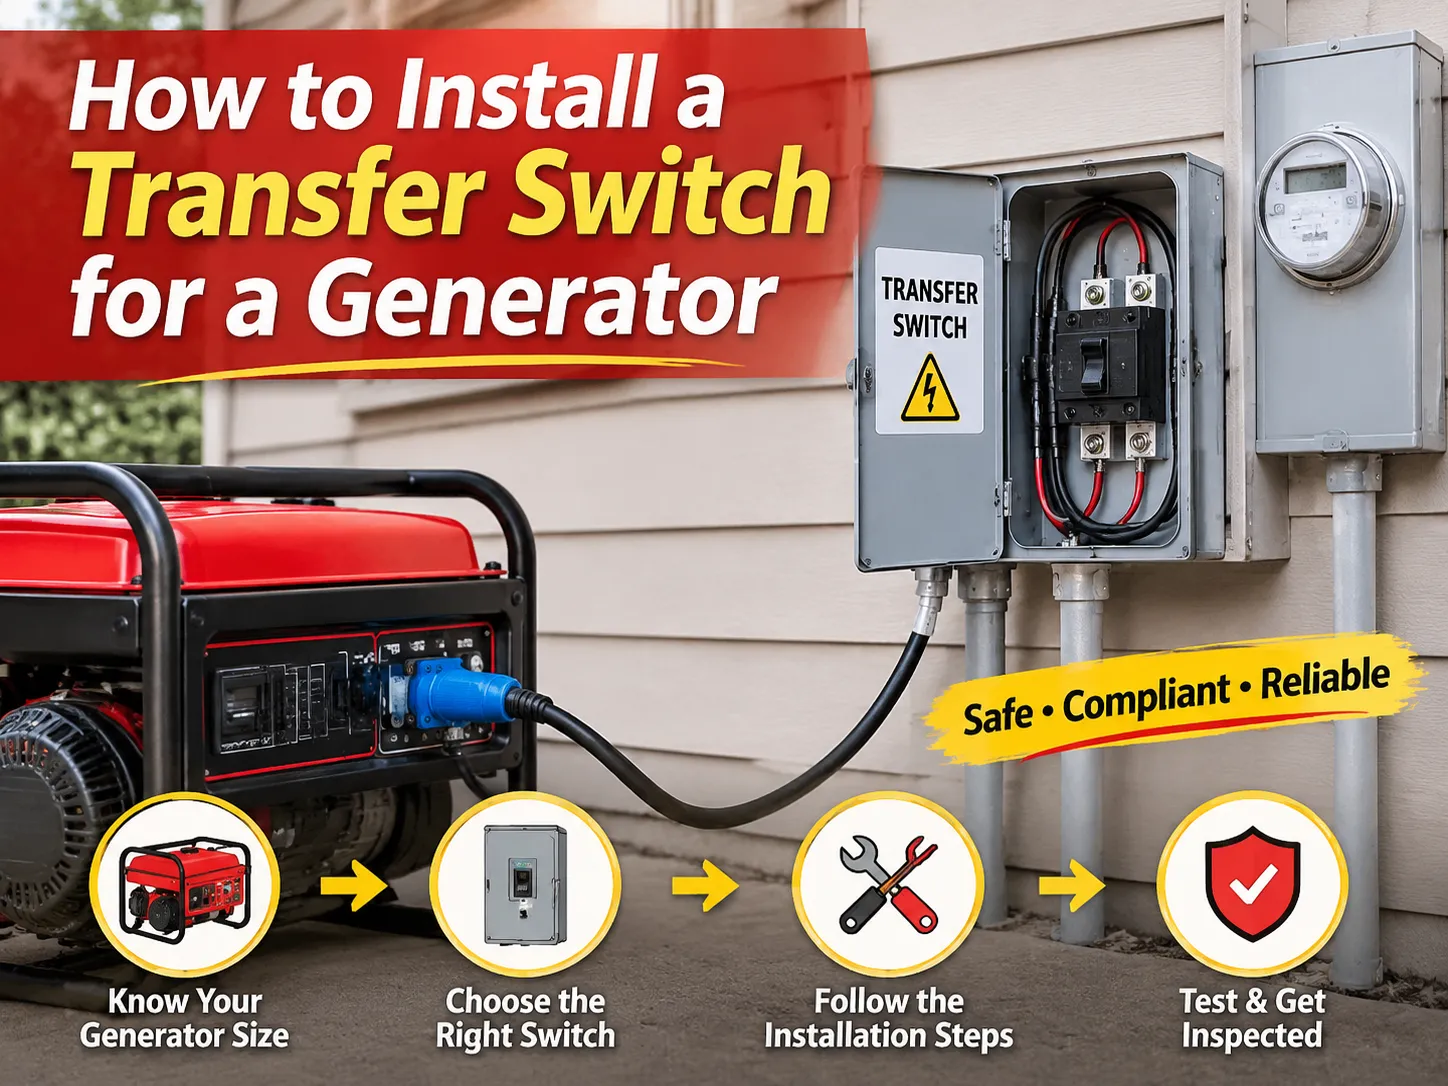
Một công tắc chuyển mạch cần có công suất định mức bằng hoặc lớn hơn công suất đầu ra của máy phát điện của bạn và phải chứa dây dẫn kích thước phù hợp với công suất đó và được lắp đặt sao cho dòng điện cung cấp từ lưới điện và dòng điện công suất máy phát không kết hợp tại một điểm. Ví dụ, máy phát điện di động 10.000 W sẽ tạo ra dòng điện đầu ra khoảng 41,7 A ở 240 V, vì vậy nên mua công tắc 50 A và dây đồng 6 AWG. Chi phí phần cứng trong trường hợp công tắc thủ công có dây sẵn dao động từ $400 đến $800, trong khi bộ khóa liên động có giấy phép có thể có giá từ $50 đến $150. Chi phí bổ sung sẽ bao gồm công việc của thợ điện, ước tính từ $300 đến $600, và các giấy phép. Việc lắp đặt có thể chia thành bốn thao tác cơ khí và ba thao tác điện: lựa chọn mạch, lắp đặt công tắc, lắp đặt hộp đầu vào và kéo cáp, cấp nguồn từ lưới và cấp nguồn từ máy phát sau khi đã kiểm tra. Phần về trung tính nên được đọc trước vì đây là nơi mà các cân nhắc liên quan đến công việc này thường thất bại nhất.
Công tắc chuyển mạch bạn thực sự cần
Bốn loại thiết bị được xác định là công tắc chuyển mạch, và chúng không thể thay thế cho nhau. Lựa chọn của bạn ở đây sẽ phụ thuộc vào việc bạn có máy phát điện di động hay cố định, có ai ở nhà vào thời điểm mất điện hay không, và kích thước ngôi nhà cần cấp điện.
| Sản phẩm | Chi phí phần cứng | Chức năng của nó | Phù hợp với |
|---|---|---|---|
| Công tắc chuyển mạch thủ công (MTS) | $400 đến $800 | Bảng phụ có dây sẵn với 6 đến 16 mạch nhánh và cơ chế hai vị trí bạn thao tác bằng tay | Máy phát điện di động, chủ nhà có mặt trong thời gian mất điện |
| Công tắc chuyển mạch tự động (ATS) | $400 đến $2,500 | Cảm nhận mất điện lưới, khởi động máy phát, chuyển tải, chuyển tải lại và làm mát khi lưới được khôi phục | Máy phát dự phòng với bộ điều khiển khởi động hai dây |
| Bộ khóa liên động | $50 đến $150 | Một tấm trượt được liệt kê ngăn không cho cầu dao chính và cầu dao máy phát cùng bật đồng thời | Bảng điều khiển hiện đại với hai khoảng trống liền kề miễn phí, bao phủ toàn bộ ngôi nhà |
| Hộp đầu vào và bộ dây | $100 đến $300 | Điểm kết nối chống thời tiết trên tường ngoài, cộng với dây dẫn đến máy phát | Mỗi lắp đặt di động, cùng với một trong các thiết bị trên |
Trái ngược với thiết bị điện, công tắc phải là một bảng phụ, và sự phân biệt đó phải được thực hiện tại quầy. Nó sẽ đi kèm với các cầu dao riêng, một bộ dây dẫn được lắp sẵn tại nhà máy, và người lắp đặt sẽ chuyển các mạch nhánh phù hợp từ bảng chính sang nó. Dòng công tắc chuyển mạch thủ công loại PC cho thấy cấu trúc: hai vị trí ngắt liên động, một vỏ chung, và dung lượng đầu cuối cho cả nguồn điện lưới và máy phát. Bộ khóa liên động phục vụ chức năng ngược lại. Nó thực sự không thêm gì vào số lượng mạch - nó chỉ làm cho bảng điều khiển an toàn, đó là lý do tại sao nó hoạt động rất tốt trong một ngôi nhà nơi máy phát đủ lớn để chạy mọi thứ.
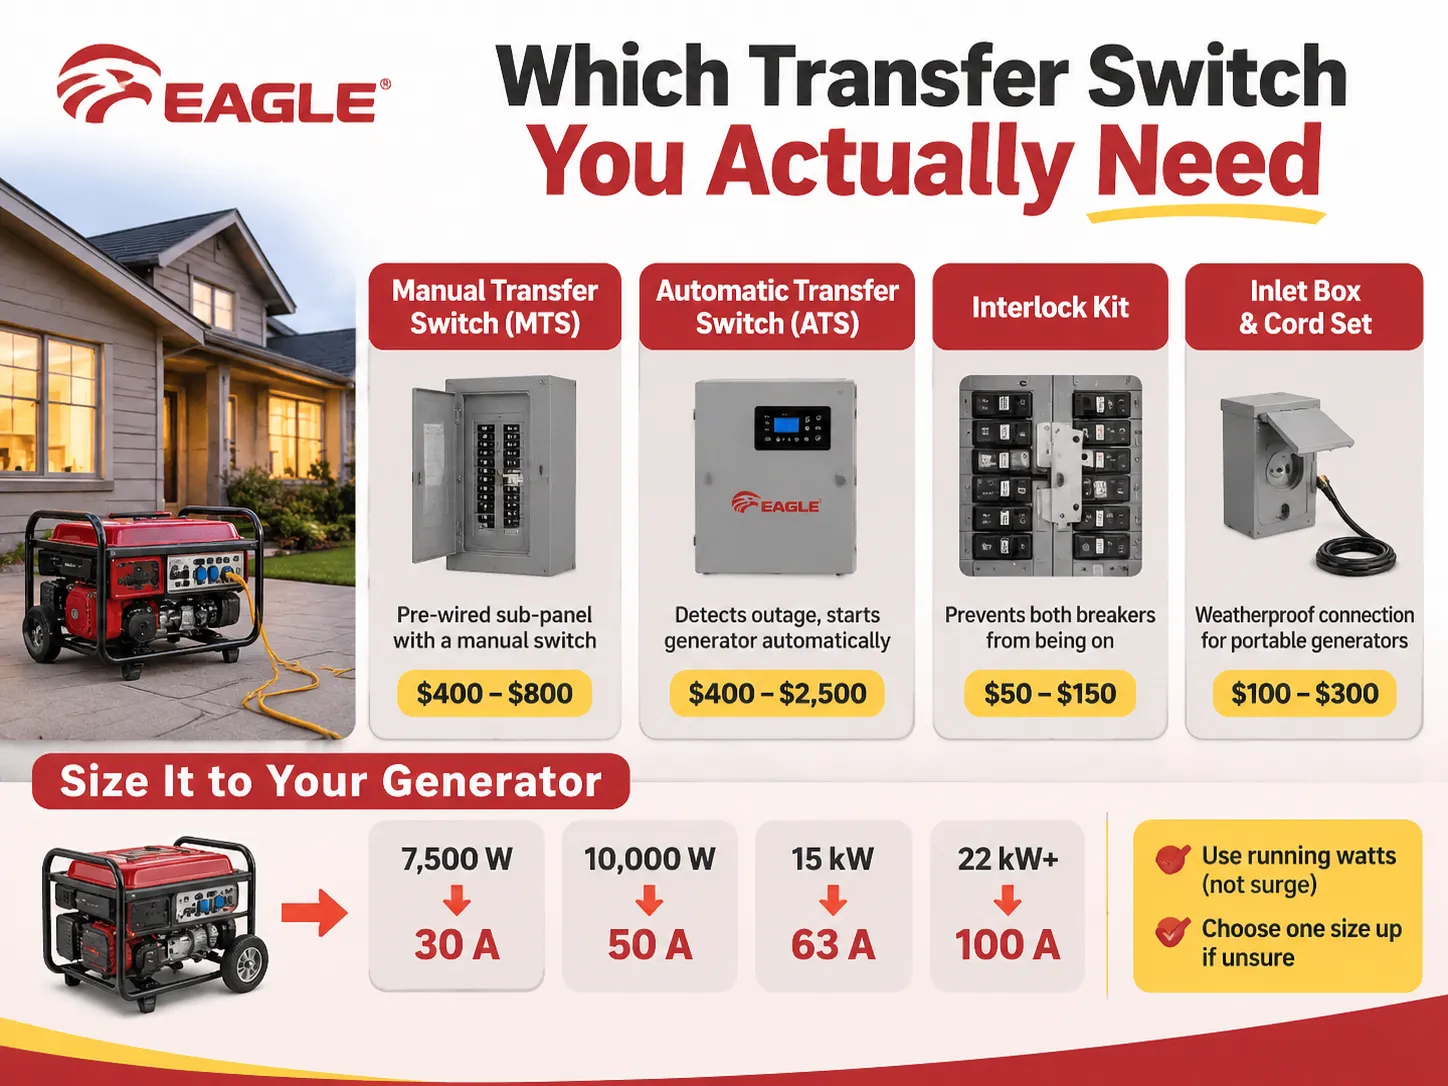
Kích thước công tắc phù hợp với máy phát, không phải với bảng điều khiển
Đánh giá dòng điện được xác định bằng cách chia công suất liên tục của máy phát cho 240 volt. Một máy 10 kW cho ra 41,7 A, tương ứng với công tắc 50 A. Máy phát 7,5 kW cho ra 31,3 A cho công tắc 30 A trong khi máy phát 12 kW cho ra chính xác 50 A, là giới hạn trên của các thiết bị di động phổ biến.
Khi tính toán dòng điện, sử dụng hai quy tắc này: sử dụng công suất chạy liên tục và không bao giờ dùng công suất đột biến vì công tắc được đánh giá cho tải liên tục. Không bao giờ đánh giá thấp công tắc vì công tắc 30 A trên máy phát 50 A sẽ chỉ giới hạn công suất đầu ra của máy phát, làm cho việc đoán vận hành máy phát trở nên thừa thãi. Chọn công tắc có đánh giá cao hơn sẽ không gây hại; tuy nhiên, chọn công tắc có đánh giá thấp hơn sẽ đi ngược lại với lẽ thường.
Trên phạm vi di động, phép tính thay đổi hình dạng. Một thiết bị 15 kW cần một thiết bị 63 A ở 240 V, đây là dải kích thước mà công tắc chuyển mạch tự động 63 A nằm, và một máy phát dự phòng toàn bộ ngôi nhà 22 kW chuyển sang công tắc có đánh giá dịch vụ 100 A. Qua điểm đó, công tắc được đánh giá theo dịch vụ, không phải máy, vì nó được chèn giữa đồng hồ đo và bảng chính.
Dụng cụ và vật liệu trước khi bắt đầu
Các dụng cụ là bình thường với một ngoại lệ. Cần có tua vít lực. Giá trị lực được chỉ định trên các đầu nối của cầu dao và công tắc chuyển mạch, và thường một đầu nối lỏng lẻo gây ra sự cố sau một thời gian.
Tua vít cách điện, đầu vuông, dụng cụ tuốt dây được đánh giá cho 6 AWG, tua vít lực theo inch-pound, bộ kiểm tra điện áp hai cực (nhớ rằng tua vít neon không phải là bộ kiểm tra), bút điện áp không tiếp xúc, dây kéo cá, máy khoan có lưỡi cưa để xuyên tường, và điện thoại để chụp ảnh trước và sau khi làm việc cũng phải có trong bộ dụng cụ của bạn. Những bức ảnh không thể được coi chỉ là ảnh chụp. Chúng là bằng chứng của việc nối đất và liên kết đúng khi vỏ bảo vệ được lắp đặt.
Vật liệu: công tắc, hộp đầu vào được đánh giá NEMA 3R trong trường hợp nó được lắp đặt ngoài trời, bốn dây có kích thước tiêu chuẩn, ống dẫn và phụ kiện, bộ ngắt mạch hai cực cho nguồn điện, chất bịt kín thời tiết, nhãn, dây cáp máy phát điện có chiều dài đủ. Bộ dụng cụ thường đi kèm với dây dài 10ft, điều này hóa ra quá ngắn khi xét đến việc máy phát được lắp đặt xa nhà và ống xả hướng về phía đối diện.
Bước 1 đến Bước 4: Giấy phép, Cách ly, Mạch và Lắp đặt
- Bước 1. Lấy phê duyệt trước. Hầu hết các đô thị yêu cầu bạn phải có giấy phép điện cùng với kiểm tra công tắc chuyển mạch, thường có chi phí trong khoảng $50 đến $300. Việc lấy giấy phép trước sẽ tiết kiệm chi phí hơn so với sau khi hoàn thành toàn bộ công việc. Ở một số khu vực pháp lý, việc kiểm tra không thể được lên lịch lại sau khi đã hoàn thành.
- Bước 2. Ngắt kết nối và kiểm tra. Tắt bộ ngắt mạch chính của bạn trước. Sau đó, sử dụng bộ kiểm tra hai cực để kiểm tra các đầu nối. Việc kiểm tra trong bảng điện khi bộ ngắt chính của bạn đã tắt cho biết trạng thái hoạt động của bộ ngắt chính nhưng không có nghĩa là các đầu nối của bạn an toàn nếu có sự cố với bộ ngắt chính hoặc có nguồn điện khác.
- Bước 3. Chọn mạch. Khi sử dụng công tắc thủ công, bạn có thể kết nối khoảng 5-16 mạch. Bạn phải lập danh sách chính xác chỉ bao gồm những thiết bị cần được kết nối khi hoạt động. Đếm hai tải nếu chúng là 240 volt. Đừng mắc bẫy và bao gồm bếp nấu và máy sấy của bạn vì máy phát điện di động không thể vận hành các thiết bị này.
- Bước 4. Lắp đặt công tắc. Bạn cần đặt nó gần bảng điện chính để các đường ống dẫn có thể ngắn. Thiếu không gian dưới vỏ bảo vệ hoặc chiều dài dây không đúng là vấn đề về quy chuẩn cần được giải quyết thêm. Bạn cũng phải lắp công tắc sao cho cân bằng.
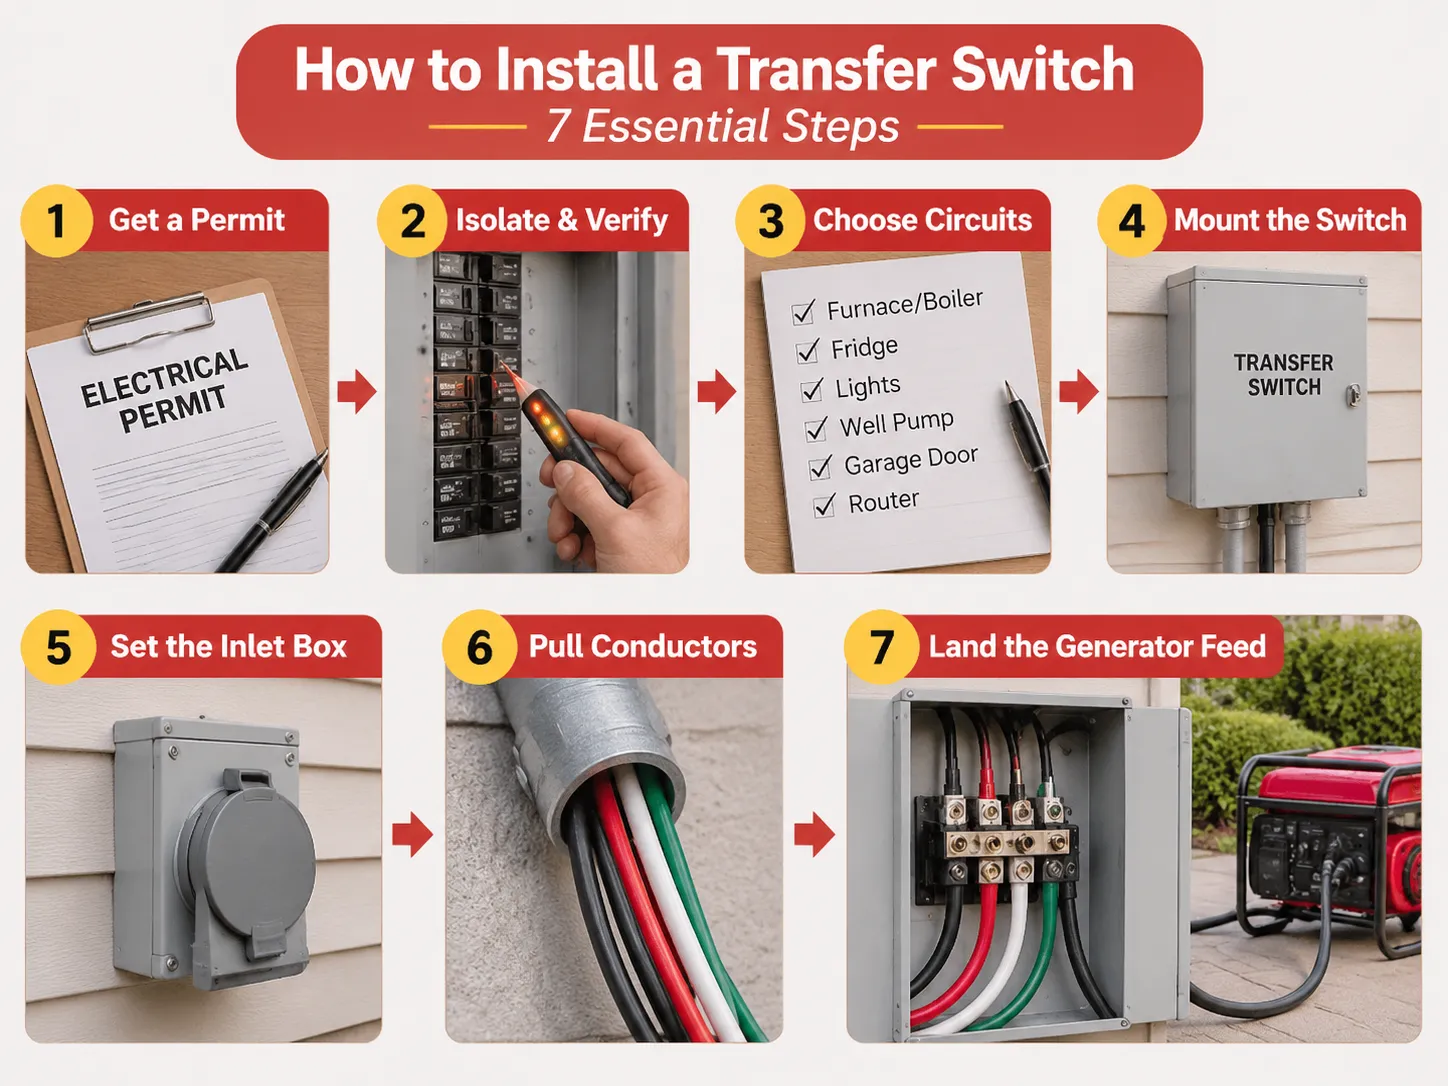
Bước 5 đến Bước 7: Ống dẫn, Dây dẫn và Hộp đầu vào
- Bước 5. Cố định hộp đầu vào tại vị trí. Hộp nên được đặt trên tường ngoài, không quá xa nơi máy phát sẽ được lắp đặt. Chiều cao cũng nên được chọn sao cho không có tuyết hoặc nước đọng trên dây cáp. Hộp đầu vào NEMA 14-50R cung cấp hai dây nóng, một dây trung tính và một dây nối đất. Loại hộp đầu vào phổ biến khác là CS6375, loại bạn chọn sẽ phụ thuộc vào phích cắm trên máy phát. Chọn sai loại sẽ khiến bạn phải mua thêm hộp đầu vào khác hoặc bộ chuyển đổi. Trong mọi trường hợp, bộ chuyển đổi 50A không được khuyến khích trong môi trường ẩm ướt.
- Bước 6. Kéo dây dẫn vào. Đối với hệ thống 50 A, cần bốn dây dẫn đồng 6 AWG gồm một dây đen, một dây đỏ, một dây trắng và một dây xanh lá. Dây dẫn đồng 6 AWG có thể chịu dòng điện an toàn 65 A ở nhiệt độ 75 °C. Do đó, có thể nói rằng điện áp rơi trên một dây dẫn cho chiều dài 50 ft khoảng 2 % trong tổng điện áp rơi cho phép 3% trên đường cấp nguồn. Cáp NM-B không thể sử dụng bên trong ống dẫn ngoài trời hoặc khu vực ẩm ướt, do đó phải sử dụng THHN hoặc XHHW trong ống dẫn. Kích thước ống dẫn phải phù hợp với số lượng dây dẫn được sử dụng, cho phép việc kéo dây dễ dàng.
- Step 7. Land the generator feed from the generator to the hot bar. The generator feed making the hot, neutral and ground connections. Once these connections have been made, conduct the utilities connection from the two-pole breaker in the main panel. The two connections should be kept separated in the enclosure. The conductors should be dressed to avoid crossing of moving contacts.
Wiring the Switch: Utility Side, Generator Side, and the Breaker That Feeds It
The utility side comes from a new two-pole breaker in the main panel, sized to the switch rating. For a 50 A switch that is a 50 A two-pole breaker, and a standard thermal-magnetic device of the kind in this 63 A miniature circuit breaker range is what the circuit expects: 6 kA or 10 kA interrupting capacity, C curve for mixed loads, and a torque value that has to be honoured on both lugs.
The generator-side voltage-derived comes into the inlet box. Within a manual switch, there are two breaker positions for each branch circuit: one fed from the utility bus and the other, in turn, fed from the generator bus. And the mechanism ensures that only one bus is energized at any time. This is the whole trick, and it is mechanical-as opposed to electronic-in nature. There’s no way to bypass it with a software bug or a stuck relay.
Within an automatic switch, the logic is contrary. A controller would monitor both sources, start the generator, wait for the frequencies and voltages to stabilize, and then activate the motor-operated mechanism. This transfer is temporarily delayed for two reasons: first, an accelerating generator produces low voltage at low frequency, and closing onto a load at this time causes failure of compressor motors; second, a changeover is put on hold for a second reason, which lies in order that the utility can settle down before handing back the house.
The Neutral Question That Fails More Inspections Than Anything Else
There are two valid ways to manage the neutral, and making the incorrect choice will lead to either shock risks or nuisance trips.
- Solid neutral, non-separately derived. The neutral of the generator and that of the utility are linked at the switch, while the generator frame remains bonded as part of the same grounding system. In this configuration, the generator’s neutral has to be unbonded from the frame, as the presence of two separate bonds in the system results in neutral current going through the ground conductors. That is the most common setup for portable generators feeding an isolation switch.
- Switched neutral, separately derived. When the switch disconnects the neutral together with hots, the generator becomes a separately derived system, and the neutral is bonded either at the generator or switch while having the grounding electrode conductor going to the grounding system of the building. This arrangement is used in much larger stationary setups and for switches rated for the service.
- The failure mode assumes the use of a portable generator with a bonded neutral in a solid neutral switch. In that case, it results in parallel neutral paths, ground current, and nuisance tripping of GFCI devices every time the generator is on. Look for the instructions that specify whether the generator neutral is bonded, examine the switch instructions for the arrangement suitable for this case, and note what you’ve found. If the two instructions contradict each other, you’ll have to do something minor yet specific to fix this issue.
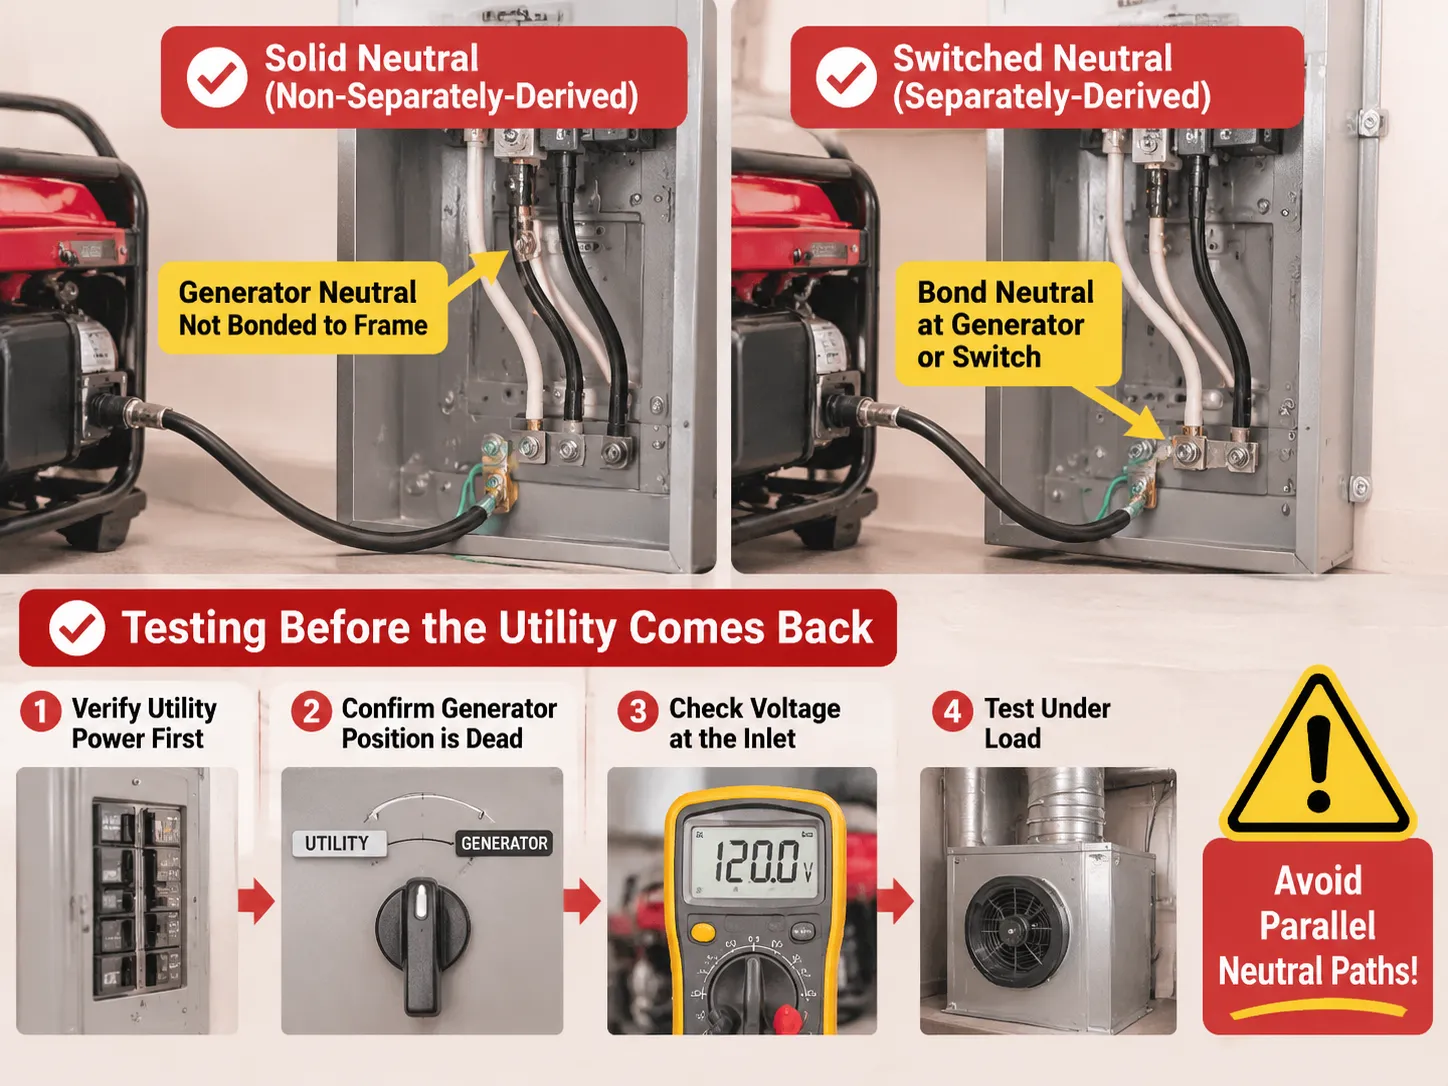
Testing Before the Utility Comes Back
To ensure your safety while testing, you should start with resetting the generator by disconnecting it from the system and then checking power on the utility panel. This will show whether there is any voltage present on circuits being backed up. Following that, plug the generator in and see if there is no power in the same circuits.
After that, you will have to start the generator outside, then connect the cord and check voltage before switching on the generator. You should expect reading of 240V between the two hot phases, 120V on hot vs neutral and 120V on hot vs ground. When the neutral is missing, you will read 120V on hot vs ground and some strange voltage on hot vs neutral.
After that you have to switch to the generator and start checking the loads on circuits one by one from the highest power draw unit in each of the circuits. The best way to test the system would be to start a furnace fan. The key point here is taking the voltage when all the load is connected.
What the Job Actually Costs
The cost of the hardware for a 10-circuit manual transfer switch with an inlet and cable ranges from $500 to $900. In an installation of a manual transfer switch that has been prewired, the labor customary to be about from 2 to 4 hours, which will be costing roughly around $300 to $600. Adding the cost of the permit will bring the total to around $850 to $1,800 for the simplest of installations.
Interlock kits are relatively cheaper as compared to the previous options. The cost of interlock kits is from $50 to $150 and that of the electrician is about $150 to $400 as the task involves placing only one circuit breaker and a faceplate. You can also find expensive automatic whole house switches that may cost you $800 to $2,500 as the switch alone will take a longer period to install. For scale at the larger end, the pricing structure on a 600 A four-pole service entrance automatic transfer switch shows how quickly switchgear pricing moves once the device becomes service-rated.
Mistakes That Get Installations Redone
Double male cord. Using a cord with both ends being a male plug to connect generator to dryer outlet is the most hazardous shortcut in the industry. It backfeeds the panel and energizes service conductors, which may kill utility personnel or damage the generator when the grid goes back online. In addition to this, it is against code everywhere, and no inspector will let it go.
Undersized conductors. A 50 A switch fed using 10 AWG wire simply because it happens to be available on the truck. Even though the breaker does its job, the wire overheats, and the failure can take place months later.
Generator placed too close to the house. The total number of fatalities due to carbon monoxide poisoning in America reaches about 100 each year, and nearly 80% of those happen in domestic settings. So, the generator must be kept outside, at a considerable distance from the doors and windows, exhaust pointing away from the house and a battery-powered CO alarm operating on all floors.
No load calculation. When the generator is connected to a switch with many circuits that cannot be supported by the generator, the breaker will trip at the first cold night. So, the watts for all devices must be calculated to avoid any problem.
Unmarked circuits. A panel directory made with a pencil and never updated can create a problem during the blackout that happens in the middle of the night. It is recommended to print the panel directory so there is a copy available when needed.
Manual or Automatic: Which One Belongs in Your House
Manual switches are based on the premise that the individual is in the house, awake, and able to venture out into inclement weather. This is acceptable for most homes and outages, which last hours rather than days. However, manual switches fail houses with wet basements containing a sump pump, people with medical conditions, or an owner on the move.
On the other hand, automatic switches operate on the understanding that a generator is permanently installed and supplied with a start signal, has been provided with enough fuel to run for several days, and has a functioning exercise regimen. The 100 A automatic transfer switch is the size band that suits a service-rated residential installation, with adjustable transfer and retransfer delays so the generator is not asked to accept load before it is ready.The trade is legit: an ATS costs about 2 to 4 times more than a manual switch plus required equipment like a battery, controller and yearly service costs. In exchange you get lights without needing to leave bed.
A practical way could help reduce costs. You could set a large manual switch and leave space in the box for a controller later on. Panel and input costs are usually high, and it is easy to change a mechanism later.
Câu hỏi thường gặp
Can I install a generator transfer switch myself?
In various localities it is possible for a resident to apply for an electrical permit for installation on their personal single-family house and perform the necessary work pending inspection. It is the conditions that are important rather than the permission: the panel should be turned off, the wires should be of adequate size, the neutral connection should correspond to the one on the generator, and the installation should be performed properly. If anything in those four requirements is questionable, then the answer should be ‘no’. Interlocking kits are the easiest choice for DIY enthusiasts, but still need to be certified and compatible with the given model of the electrical panel.
How much does it cost to put in a generator transfer switch?
If you’re purchasing a hard-wired 10-circuit manual switch, your hardware expenses will generally fall in the range of $400 to $800, while installation by an electrician will run between $300 and $600. Permits will often cost from $50 to $300, for a total installed cost of between approximately $850 and $1,800. Interlock kits run from $50 to $150 in parts and from $150 to $400 for installation. A whole-house automatic switching mechanism for the use of a standby generator runs from $800 to $2,500, with the actual cost of installing such a switch higher, since service conductors and wiring for the control of the generator are necessary. An inlet box and a long enough cord often add about $100 to $300 to the installation estimate, but are sometimes left out.
Can a homeowner install a generator transfer switch?
Often, the permit is the determining aspect, and not really the talent. Some municipal building departments allow owner-permit electrical work on an owner-occupied single-family dwelling and with the inspection; a very few require a licensed electrician to do anything that is considered to take place inside of the service panel. Be sure to call the authority having jurisdiction before you buy anything hardware-wise, since that is going to change the picture entirely. Note as well that the unpermitted installation could be enough for the insurer to deny a fire claim which is in fact much larger than the amount you saved on labour.
What size transfer switch do I need for a 10,000 watt generator?
The switch is rated for 50 A. The calculation of operating wattage divided by 240 V yields the result of 10,000 ÷ 240, which is 41.7 A. The next standard size switch is, therefore, 50 A. Only operating wattage should be considered and not starting wattage since a switch operates continuously on the same current. A 50 A switch requires six AWG wires made of copper material and a double pole 50 A breaker on the utility side. If the generator outlet is 30 A L14-30 versus 50 A 14-50 then both switch and inlet have to match the outlet and the generator will be limited by the socket.
Do I need a transfer switch if I only use extension cords?
No, and that is the only legally permissible option. Instead of wiring the generator into your house system, extension cords are used to connect the generator with an appliance, thus making the generator independent of the house wiring which prevents any backfeed. This means convenience and safety: runners through the doors, no fixed electrical loads such as contacting pumps or a furnace, and clogged path with obstacles in the dark. The minute you need to use electricity in a fixed installation, you must use a transfer device according to NECA702.
Tài liệu tham khảo
- Electrical Engineering Portal — Installing a Manual Transfer Switch
- NFPA — National Electrical Code, Article 702 Optional Standby Systems
- Generac — Home Standby and Transfer Switch Products
- Reliance Controls — Manual Transfer Switch and Inlet Box Systems
- ASCO Power Technologies — Automatic Transfer Switch Engineering
Kết luận
Installing the generator system is easy. The tough part is deciding. Size from running watts, keep switched and inlet matched to generator output and establish the neutral before pulling the first wire because that’s what fails inspection and puts current where it should not go.
Then buy hardware only once. A switch rated one size above your generator will cost only a bit more and will never let you down; a switch that is rated one size below will ruin the generator you already have. If you tell us what your generator’s continuous rating is, its outlet and whether or not its neutral is bonded we will tell you which board and which pole configuration you need for the job.