
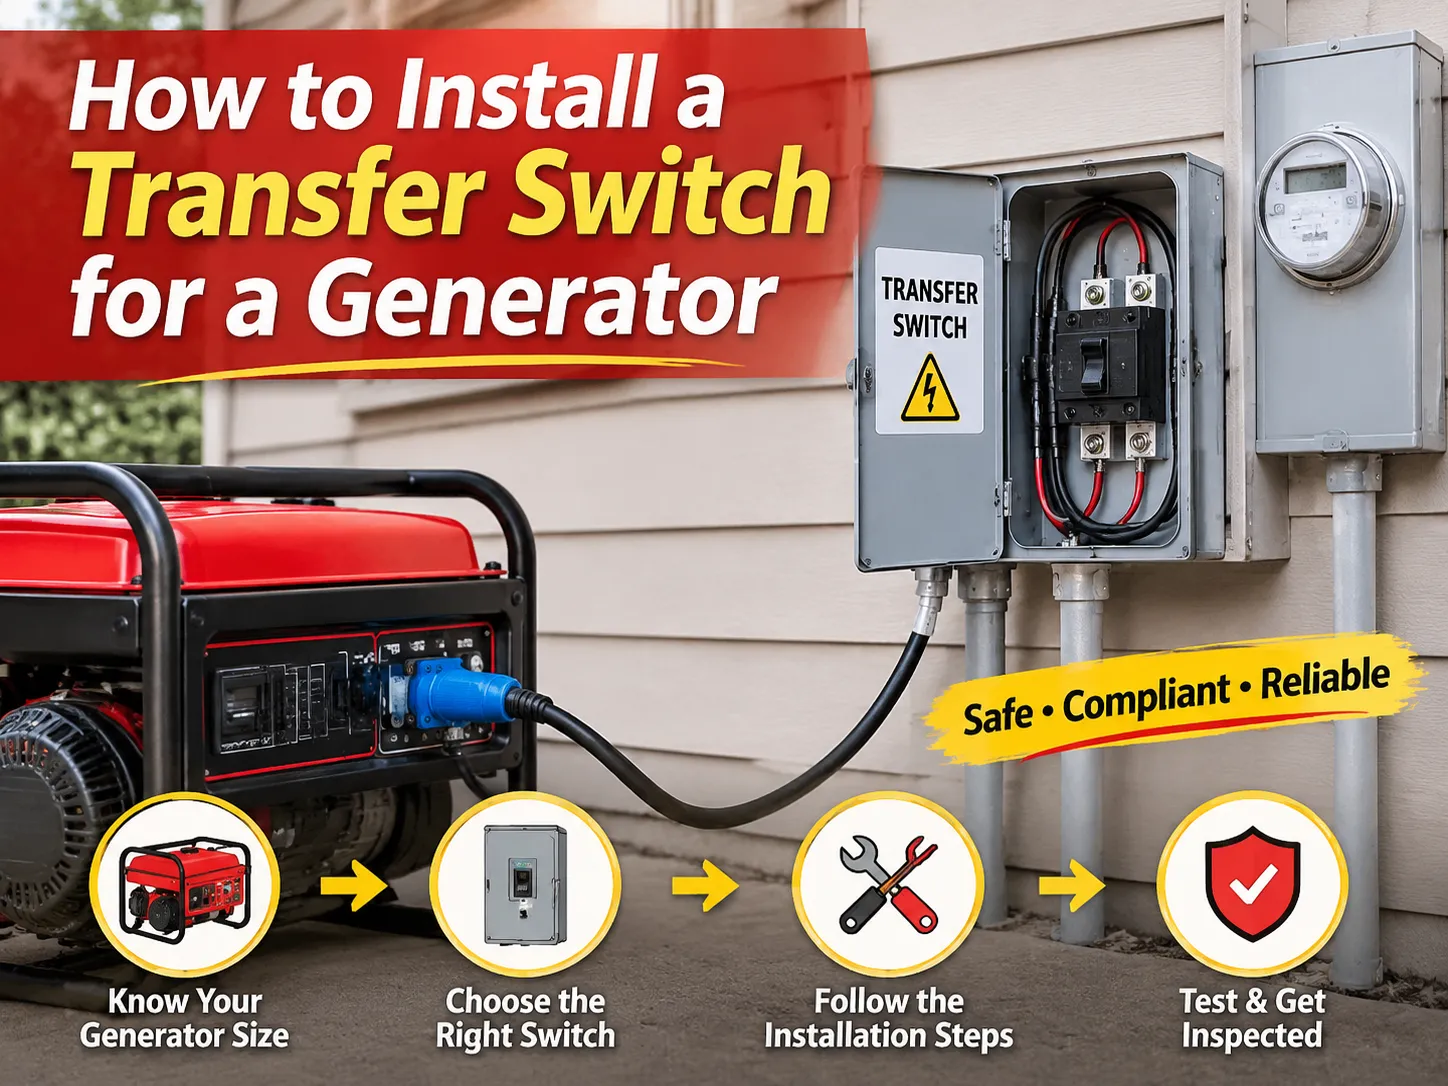
Setiap musim dingin, ada seseorang di rumah yang tidak dipanaskan yang menatap panel, melirik ke arah generator di garasi, dan bertanya-tanya apakah cukup jika dia mendapatkan kabel dan dua penjepit buaya. Itu tidak cukup, dan alasannya bukan dokumen. Alasannya adalah bahwa backfeeding panel menempatkan tegangan dari generator di sisi pengguna instalasi, sehingga memungkinkan seorang teknisi listrik yang datang untuk memulihkan jaringan bertemu dengan tegangan tersebut. Inilah sebabnya ada transfer switch, dan mengapa instalasi berputar pada satu masalah dasar: bagaimana memastikan bahwa sisi pengguna dari generator dan jaringan tidak pernah terhubung secara fisik, dan bagaimana menetapkannya.
Sekumpulan persyaratan yang diberikan di bawah ini didasarkan pada asumsi bahwa sirkuit yang dimaksud adalah sirkuit satu fasa yang beroperasi di Amerika Utara dan menggunakan generator portabel atau cadangan. Urutannya cukup disengaja; proses penentuan ukuran adalah langkah pertama, karena memengaruhi setiap tindakan lain yang dilakukan kemudian dalam proses, kemudian berlanjut ke pekerjaan mekanis, dan kemudian ke konduktor, netral, dan grounding, yang secara tak terduga ternyata merupakan keputusan penting yang banyak orang serahkan kepada inspektur untuk menangani.
Transfer switch harus memiliki rating yang sama atau lebih besar dari output generator Anda dan harus mengandung kabel dengan ukuran yang tepat untuk rating tersebut serta dipasang sedemikian rupa sehingga arus pasokan listrik utilitas dan arus kapasitas generator tidak bergabung di satu titik. Misalnya, generator portabel 10.000 W akan menghasilkan output sekitar 41,7 A pada 240 V, jadi disarankan untuk membeli switch 50 A dan kabel tembaga 6 AWG. Biaya perangkat keras dalam kasus switch manual yang sudah dipasang sebelumnya bervariasi antara $400 dan $800, sementara kit interlock berlisensi dapat berharga $50-$150. Biaya tambahan akan mencakup pekerjaan tukang listrik, yang diperkirakan antara $300 hingga $600, dan izin. Instalasi dapat dibagi menjadi empat operasi mekanis dan tiga operasi listrik: pemilihan sirkuit, pemasangan switch, pemasangan kotak inlet dan penarikan kabel, pemasangan pasokan utilitas dan pemasangan pasokan generator setelah pengujian dilakukan. Bagian tentang netral harus dibaca terlebih dahulu karena mewakili tempat di mana pertimbangan terkait pekerjaan ini paling sering gagal.
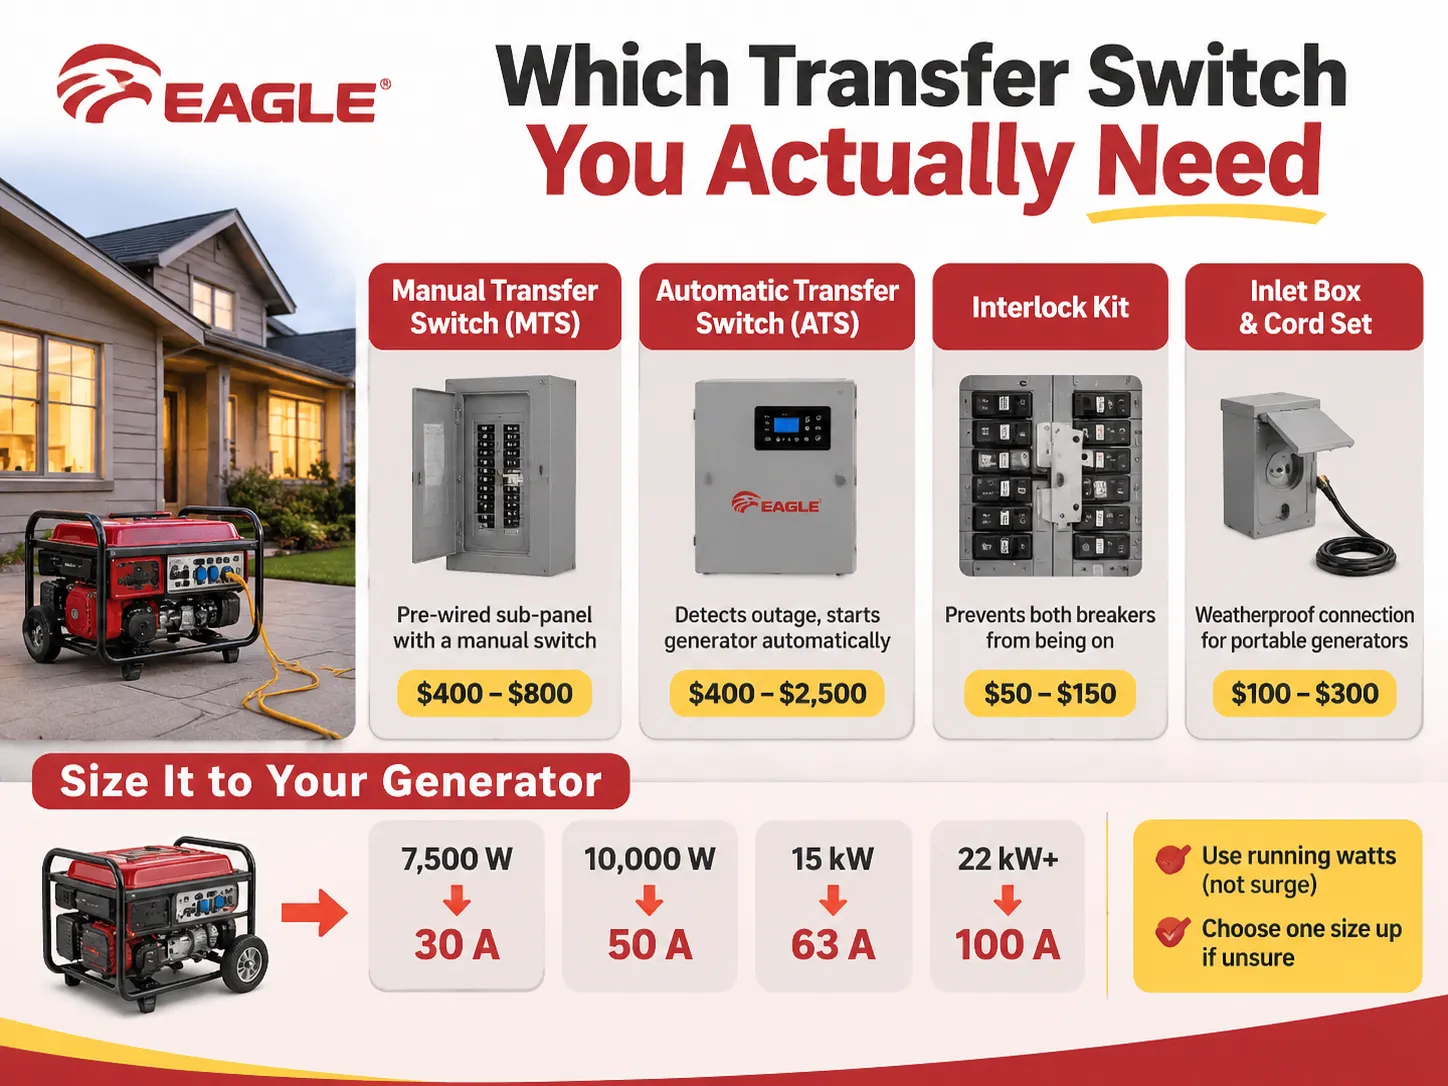
Transfer Switch Mana yang Sebenarnya Anda Butuhkan
Empat jenis perangkat diidentifikasi sebagai transfer switch, dan mereka tidak dapat digunakan saling menggantikan. Pilihan Anda di sini akan bergantung pada apakah Anda memiliki generator portabel atau tetap, apakah ada orang di rumah saat pemadaman listrik, dan ukuran rumah yang perlu dialiri listrik.
| Produk | Biaya perangkat keras | Fungsinya | Cocok untuk |
|---|---|---|---|
| Transfer switch manual (MTS) | $400 hingga $800 | Sub-panel pra-kabel dengan 6 hingga 16 sirkuit cabang dan mekanisme dua posisi yang Anda operasikan dengan tangan | Generator portabel, pemilik yang hadir selama pemadaman |
| Saklar transfer otomatis (ATS) | $400 hingga $2.500 | Mendeteksi kehilangan utilitas, memulai generator, memindahkan beban, memindahkan kembali dan mendinginkan saat pemulihan | Generator cadangan dengan pengontrol start dua kabel |
| Kit interlock | $50 hingga $150 | Pelat geser terdaftar yang menghentikan pemutus utama dan generator agar tidak aktif bersamaan | Panel modern dengan dua ruang bebas bersebelahan, cakupan seluruh rumah |
| Kotak inlet dan set kabel | $100 hingga $300 | Titik sambungan tahan cuaca di dinding luar, plus kabel ke generator | Setiap instalasi portabel, bersama salah satu dari yang di atas |
Berbeda dengan perangkat listrik, saklar harus berupa sub-panel, dan perbedaan itu harus dibuat di konter. Ini akan dilengkapi dengan pemutusnya sendiri, satu set kabel pabrik, dan pemasang akan memindahkan sirkuit cabang yang sesuai dari panel utama ke sub-panel tersebut. Rentang saklar transfer manual kelas PC menunjukkan konstruksi: dua posisi pemutusan yang saling terkunci, satu enclosure umum, dan kapasitas terminal untuk pasokan utilitas dan generator. Kit interlock berfungsi sebaliknya. Kit ini memang tidak menambah jumlah sirkuit—hanya membuat panel aman, itulah sebabnya kit ini bekerja sangat baik di rumah di mana generator cukup besar untuk menjalankan semuanya.
Menyesuaikan Ukuran Saklar dengan Generator, Bukan dengan Panel
Rating arus ditentukan dengan membagi daya kontinu generator dengan 240 volt. Mesin 10 kW menghasilkan 41,7 A, yang sesuai dengan saklar 50 A. Generator 7,5 kW menghasilkan 31,3 A untuk saklar 30 A sementara generator 12 kW menghasilkan tepat 50 A sehingga menjadi batas atas unit portabel yang populer.
Saat menghitung arus gunakan dua aturan ini: gunakan watt berjalan dan jangan pernah watt lonjakan karena saklar dinilai untuk beban kontinu. Jangan pernah meremehkan saklar karena saklar 30 A pada generator 50 A hanya akan membatasi output generator sehingga membuat perkiraan operasi generator menjadi tidak perlu. Memilih saklar dengan rating lebih tinggi tidak akan merugikan; namun, memilih yang lebih rendah akan bertentangan dengan akal sehat.
Di atas rentang portabel, perhitungan arus berubah bentuk. Unit 15 kW membutuhkan perangkat 63 A pada 240 V, yang merupakan rentang ukuran di mana saklar transfer otomatis 63 A berada, dan generator cadangan seluruh rumah 22 kW beralih ke saklar berperingkat layanan 100 A. Setelah titik itu, saklar dinilai berdasarkan layanan, bukan mesin, karena dipasang di antara meteran dan panel utama.
Alat dan Bahan Sebelum Memulai
Instrumen normal dengan satu pengecualian. Obeng torsi diperlukan. Nilai torsi ditunjukkan pada lug pemutus dan saklar transfer, dan biasanya lug yang longgar menyebabkan kegagalan setelah beberapa waktu.
Obeng terisolasi, penggerak persegi, pengupas kawat yang dinilai untuk 6 AWG, obeng torsi dalam inch-pounds, penguji tegangan dua kutub (ingat obeng neon bukan penguji), pena tegangan tanpa kontak, fish tape, bor dengan gergaji untuk menembus dinding, dan telepon untuk mengambil gambar sebelum dan sesudah pekerjaan juga harus ada dalam peralatan Anda. Gambar-gambar tersebut tidak dapat dianggap sekadar gambar. Mereka adalah bukti dari pembumian dan pengikatan yang benar saat penutup dipasang.
Material: saklar, kotak inlet yang dinilai NEMA 3R jika dipasang di luar, empat kawat dengan ukuran yang diatur, conduit dan fitting, pemutus dua kutub untuk pasokan listrik, sealant cuaca, label, kabel generator dengan panjang yang cukup. Kit biasanya datang dengan kabel sepanjang 10 kaki, yang ternyata terlalu pendek mengingat generator dipasang jauh dari rumah dan knalpot mengarah ke sisi yang berlawanan.
Langkah 1 sampai Langkah 4: Izin, Isolasi, Sirkuit dan Pemasangan
- Langkah 1. Dapatkan persetujuan terlebih dahulu. Hampir semua pemerintah daerah mengharuskan Anda memperoleh izin listrik beserta inspeksi saklar transfer, yang biasanya biayanya berkisar antara $50 hingga $300. Lebih hemat biaya untuk mendapatkan izin terlebih dahulu daripada setelah semua pekerjaan selesai. Di beberapa yurisdiksi, inspeksi tidak dapat dijadwalkan secara retroaktif sama sekali.
- Langkah 2. Putuskan sambungan dan periksa. Matikan pemutus utama Anda terlebih dahulu. Setelah itu, gunakan penguji dua kutub untuk memeriksa terminal. Pengujian di panel saat pemutus utama Anda mati menunjukkan status kerja pemutus utama Anda tetapi tidak berarti bahwa lug Anda aman jika terjadi sesuatu pada pemutus utama atau ada sumber daya lain.
- Langkah 3. Pilih sirkuit. Saat menggunakan saklar manual, Anda dapat menghubungkan sekitar 5-16 sirkuit. Anda harus membuat daftar yang akurat yang hanya mencakup perangkat yang perlu dihubungkan saat bekerja. Hitung dua beban jika mereka 240 volt. Jangan terjebak dan memasukkan kompor dan pengering Anda karena generator portabel tidak dapat mengoperasikan perangkat ini.
- Langkah 4. Pasang saklar. Anda perlu menempatkannya dekat panel utama sehingga jalur conduit bisa pendek. Kekurangan ruang di bawah enclosure atau panjang kawat yang salah adalah masalah kode yang perlu penyelesaian lebih lanjut. Anda juga harus memasang saklar dalam posisi rata.
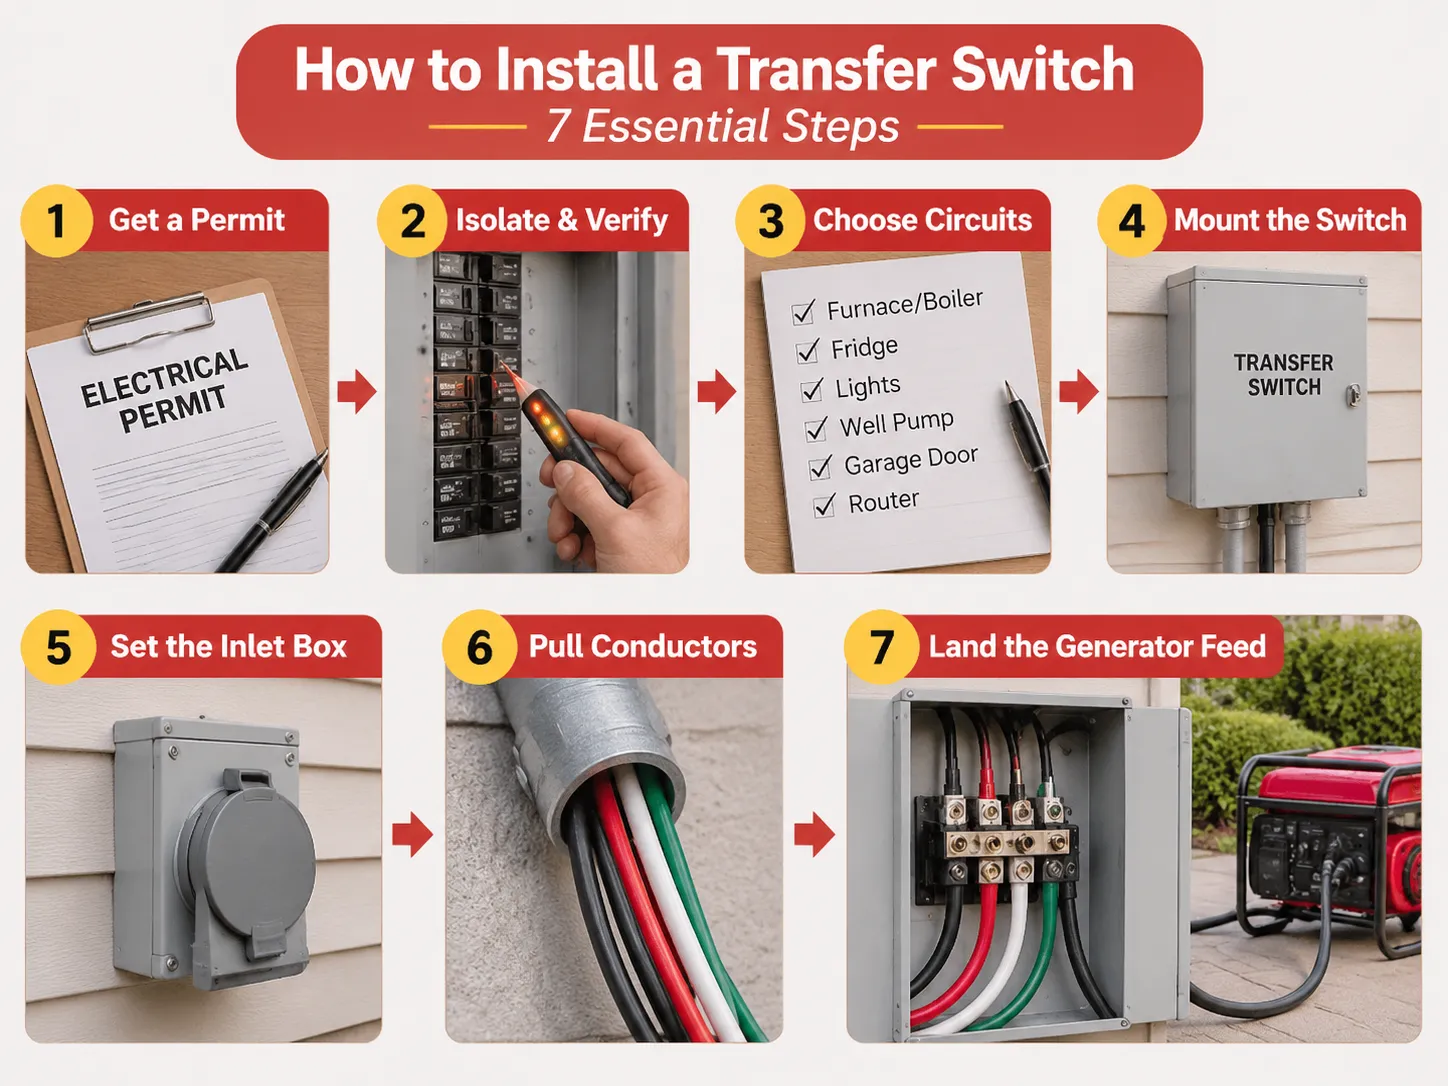
Langkah 5 sampai Langkah 7: Conduit, Konduktor dan Kotak Inlet
- Langkah 5. Pasang kotak inlet pada posisinya. Kotak sebaiknya ditempatkan di dinding luar, tidak terlalu jauh dari tempat generator akan dipasang. Tingginya juga harus dipilih agar tidak ada salju atau air tergenang di kabel. Inlet NEMA 14-50R menyediakan dua kawat panas, satu netral dan satu sambungan ground. Jenis inlet umum lainnya adalah CS6375, pilihan Anda akan bergantung pada colokan di generator. Memilih yang salah akan menyebabkan Anda harus membeli inlet lain atau adaptor. Dalam hal apapun, adaptor 50A tidak disarankan di lingkungan basah.
- Langkah 6. Tarik konduktor. Untuk sistem 50 A, diperlukan empat konduktor tembaga 6 AWG yaitu satu hitam, satu merah, satu putih, dan satu hijau. Konduktor tembaga 6 AWG dapat membawa arus sebesar 65 A dengan aman pada suhu 75 °C. Oleh karena itu, dapat dikatakan bahwa penurunan tegangan pada konduktor untuk jarak 50 kaki adalah sekitar 2 % dalam 3% penurunan tegangan yang diizinkan pada feeder. Kabel NM-B tidak dapat digunakan di dalam saluran luar atau area basah, oleh karena itu THHN atau XHHW harus digunakan dalam saluran. Ukuran saluran harus sesuai dengan jumlah konduktor yang digunakan, memungkinkan penarikan yang mudah.
- Step 7. Land the generator feed from the generator to the hot bar. The generator feed making the hot, neutral and ground connections. Once these connections have been made, conduct the utilities connection from the two-pole breaker in the main panel. The two connections should be kept separated in the enclosure. The conductors should be dressed to avoid crossing of moving contacts.
Wiring the Switch: Utility Side, Generator Side, and the Breaker That Feeds It
The utility side comes from a new two-pole breaker in the main panel, sized to the switch rating. For a 50 A switch that is a 50 A two-pole breaker, and a standard thermal-magnetic device of the kind in this 63 A miniature circuit breaker range is what the circuit expects: 6 kA or 10 kA interrupting capacity, C curve for mixed loads, and a torque value that has to be honoured on both lugs.
The generator-side voltage-derived comes into the inlet box. Within a manual switch, there are two breaker positions for each branch circuit: one fed from the utility bus and the other, in turn, fed from the generator bus. And the mechanism ensures that only one bus is energized at any time. This is the whole trick, and it is mechanical-as opposed to electronic-in nature. There’s no way to bypass it with a software bug or a stuck relay.
Within an automatic switch, the logic is contrary. A controller would monitor both sources, start the generator, wait for the frequencies and voltages to stabilize, and then activate the motor-operated mechanism. This transfer is temporarily delayed for two reasons: first, an accelerating generator produces low voltage at low frequency, and closing onto a load at this time causes failure of compressor motors; second, a changeover is put on hold for a second reason, which lies in order that the utility can settle down before handing back the house.
The Neutral Question That Fails More Inspections Than Anything Else
There are two valid ways to manage the neutral, and making the incorrect choice will lead to either shock risks or nuisance trips.
- Solid neutral, non-separately derived. The neutral of the generator and that of the utility are linked at the switch, while the generator frame remains bonded as part of the same grounding system. In this configuration, the generator’s neutral has to be unbonded from the frame, as the presence of two separate bonds in the system results in neutral current going through the ground conductors. That is the most common setup for portable generators feeding an isolation switch.
- Switched neutral, separately derived. When the switch disconnects the neutral together with hots, the generator becomes a separately derived system, and the neutral is bonded either at the generator or switch while having the grounding electrode conductor going to the grounding system of the building. This arrangement is used in much larger stationary setups and for switches rated for the service.
- The failure mode assumes the use of a portable generator with a bonded neutral in a solid neutral switch. In that case, it results in parallel neutral paths, ground current, and nuisance tripping of GFCI devices every time the generator is on. Look for the instructions that specify whether the generator neutral is bonded, examine the switch instructions for the arrangement suitable for this case, and note what you’ve found. If the two instructions contradict each other, you’ll have to do something minor yet specific to fix this issue.
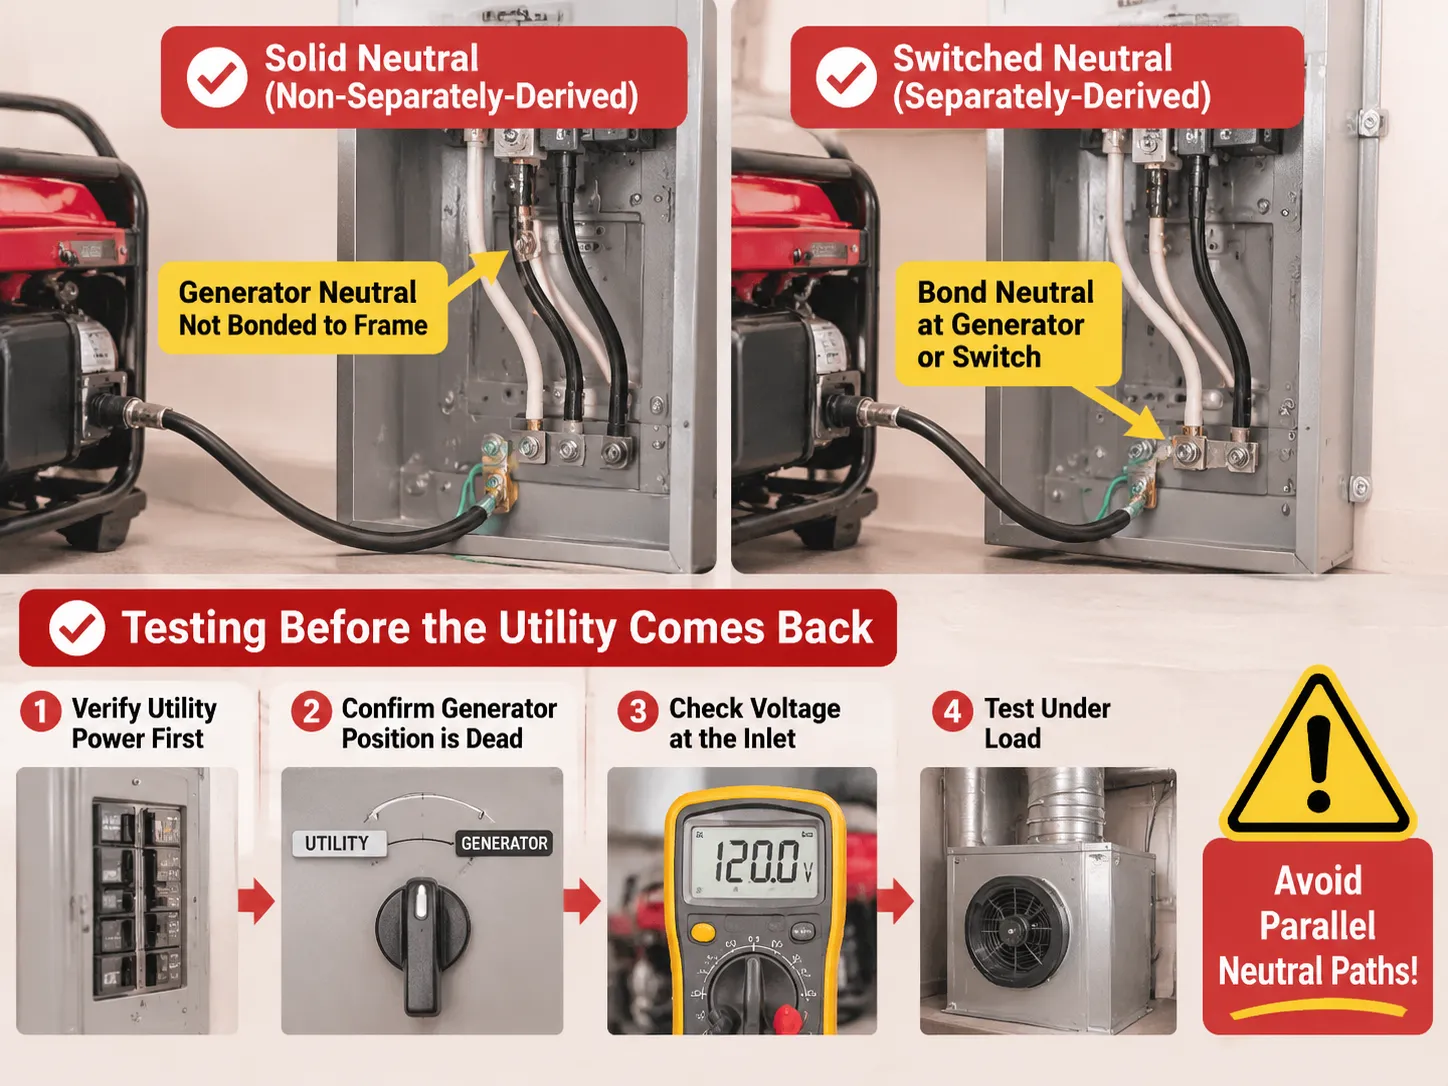
Testing Before the Utility Comes Back
To ensure your safety while testing, you should start with resetting the generator by disconnecting it from the system and then checking power on the utility panel. This will show whether there is any voltage present on circuits being backed up. Following that, plug the generator in and see if there is no power in the same circuits.
After that, you will have to start the generator outside, then connect the cord and check voltage before switching on the generator. You should expect reading of 240V between the two hot phases, 120V on hot vs neutral and 120V on hot vs ground. When the neutral is missing, you will read 120V on hot vs ground and some strange voltage on hot vs neutral.
After that you have to switch to the generator and start checking the loads on circuits one by one from the highest power draw unit in each of the circuits. The best way to test the system would be to start a furnace fan. The key point here is taking the voltage when all the load is connected.
What the Job Actually Costs
The cost of the hardware for a 10-circuit manual transfer switch with an inlet and cable ranges from $500 to $900. In an installation of a manual transfer switch that has been prewired, the labor customary to be about from 2 to 4 hours, which will be costing roughly around $300 to $600. Adding the cost of the permit will bring the total to around $850 to $1,800 for the simplest of installations.
Interlock kits are relatively cheaper as compared to the previous options. The cost of interlock kits is from $50 to $150 and that of the electrician is about $150 to $400 as the task involves placing only one circuit breaker and a faceplate. You can also find expensive automatic whole house switches that may cost you $800 to $2,500 as the switch alone will take a longer period to install. For scale at the larger end, the pricing structure on a 600 A four-pole service entrance automatic transfer switch shows how quickly switchgear pricing moves once the device becomes service-rated.
Mistakes That Get Installations Redone
Double male cord. Using a cord with both ends being a male plug to connect generator to dryer outlet is the most hazardous shortcut in the industry. It backfeeds the panel and energizes service conductors, which may kill utility personnel or damage the generator when the grid goes back online. In addition to this, it is against code everywhere, and no inspector will let it go.
Undersized conductors. A 50 A switch fed using 10 AWG wire simply because it happens to be available on the truck. Even though the breaker does its job, the wire overheats, and the failure can take place months later.
Generator placed too close to the house. The total number of fatalities due to carbon monoxide poisoning in America reaches about 100 each year, and nearly 80% of those happen in domestic settings. So, the generator must be kept outside, at a considerable distance from the doors and windows, exhaust pointing away from the house and a battery-powered CO alarm operating on all floors.
No load calculation. When the generator is connected to a switch with many circuits that cannot be supported by the generator, the breaker will trip at the first cold night. So, the watts for all devices must be calculated to avoid any problem.
Unmarked circuits. A panel directory made with a pencil and never updated can create a problem during the blackout that happens in the middle of the night. It is recommended to print the panel directory so there is a copy available when needed.
Manual or Automatic: Which One Belongs in Your House
Manual switches are based on the premise that the individual is in the house, awake, and able to venture out into inclement weather. This is acceptable for most homes and outages, which last hours rather than days. However, manual switches fail houses with wet basements containing a sump pump, people with medical conditions, or an owner on the move.
On the other hand, automatic switches operate on the understanding that a generator is permanently installed and supplied with a start signal, has been provided with enough fuel to run for several days, and has a functioning exercise regimen. The 100 A automatic transfer switch is the size band that suits a service-rated residential installation, with adjustable transfer and retransfer delays so the generator is not asked to accept load before it is ready.The trade is legit: an ATS costs about 2 to 4 times more than a manual switch plus required equipment like a battery, controller and yearly service costs. In exchange you get lights without needing to leave bed.
A practical way could help reduce costs. You could set a large manual switch and leave space in the box for a controller later on. Panel and input costs are usually high, and it is easy to change a mechanism later.
FAQ
Can I install a generator transfer switch myself?
In various localities it is possible for a resident to apply for an electrical permit for installation on their personal single-family house and perform the necessary work pending inspection. It is the conditions that are important rather than the permission: the panel should be turned off, the wires should be of adequate size, the neutral connection should correspond to the one on the generator, and the installation should be performed properly. If anything in those four requirements is questionable, then the answer should be ‘no’. Interlocking kits are the easiest choice for DIY enthusiasts, but still need to be certified and compatible with the given model of the electrical panel.
How much does it cost to put in a generator transfer switch?
If you’re purchasing a hard-wired 10-circuit manual switch, your hardware expenses will generally fall in the range of $400 to $800, while installation by an electrician will run between $300 and $600. Permits will often cost from $50 to $300, for a total installed cost of between approximately $850 and $1,800. Interlock kits run from $50 to $150 in parts and from $150 to $400 for installation. A whole-house automatic switching mechanism for the use of a standby generator runs from $800 to $2,500, with the actual cost of installing such a switch higher, since service conductors and wiring for the control of the generator are necessary. An inlet box and a long enough cord often add about $100 to $300 to the installation estimate, but are sometimes left out.
Can a homeowner install a generator transfer switch?
Often, the permit is the determining aspect, and not really the talent. Some municipal building departments allow owner-permit electrical work on an owner-occupied single-family dwelling and with the inspection; a very few require a licensed electrician to do anything that is considered to take place inside of the service panel. Be sure to call the authority having jurisdiction before you buy anything hardware-wise, since that is going to change the picture entirely. Note as well that the unpermitted installation could be enough for the insurer to deny a fire claim which is in fact much larger than the amount you saved on labour.
What size transfer switch do I need for a 10,000 watt generator?
The switch is rated for 50 A. The calculation of operating wattage divided by 240 V yields the result of 10,000 ÷ 240, which is 41.7 A. The next standard size switch is, therefore, 50 A. Only operating wattage should be considered and not starting wattage since a switch operates continuously on the same current. A 50 A switch requires six AWG wires made of copper material and a double pole 50 A breaker on the utility side. If the generator outlet is 30 A L14-30 versus 50 A 14-50 then both switch and inlet have to match the outlet and the generator will be limited by the socket.
Do I need a transfer switch if I only use extension cords?
No, and that is the only legally permissible option. Instead of wiring the generator into your house system, extension cords are used to connect the generator with an appliance, thus making the generator independent of the house wiring which prevents any backfeed. This means convenience and safety: runners through the doors, no fixed electrical loads such as contacting pumps or a furnace, and clogged path with obstacles in the dark. The minute you need to use electricity in a fixed installation, you must use a transfer device according to NECA702.
Referensi
- Electrical Engineering Portal — Installing a Manual Transfer Switch
- NFPA — National Electrical Code, Article 702 Optional Standby Systems
- Generac — Home Standby and Transfer Switch Products
- Reliance Controls — Manual Transfer Switch and Inlet Box Systems
- ASCO Power Technologies — Automatic Transfer Switch Engineering
Kesimpulan
Installing the generator system is easy. The tough part is deciding. Size from running watts, keep switched and inlet matched to generator output and establish the neutral before pulling the first wire because that’s what fails inspection and puts current where it should not go.
Then buy hardware only once. A switch rated one size above your generator will cost only a bit more and will never let you down; a switch that is rated one size below will ruin the generator you already have. If you tell us what your generator’s continuous rating is, its outlet and whether or not its neutral is bonded we will tell you which board and which pole configuration you need for the job.