
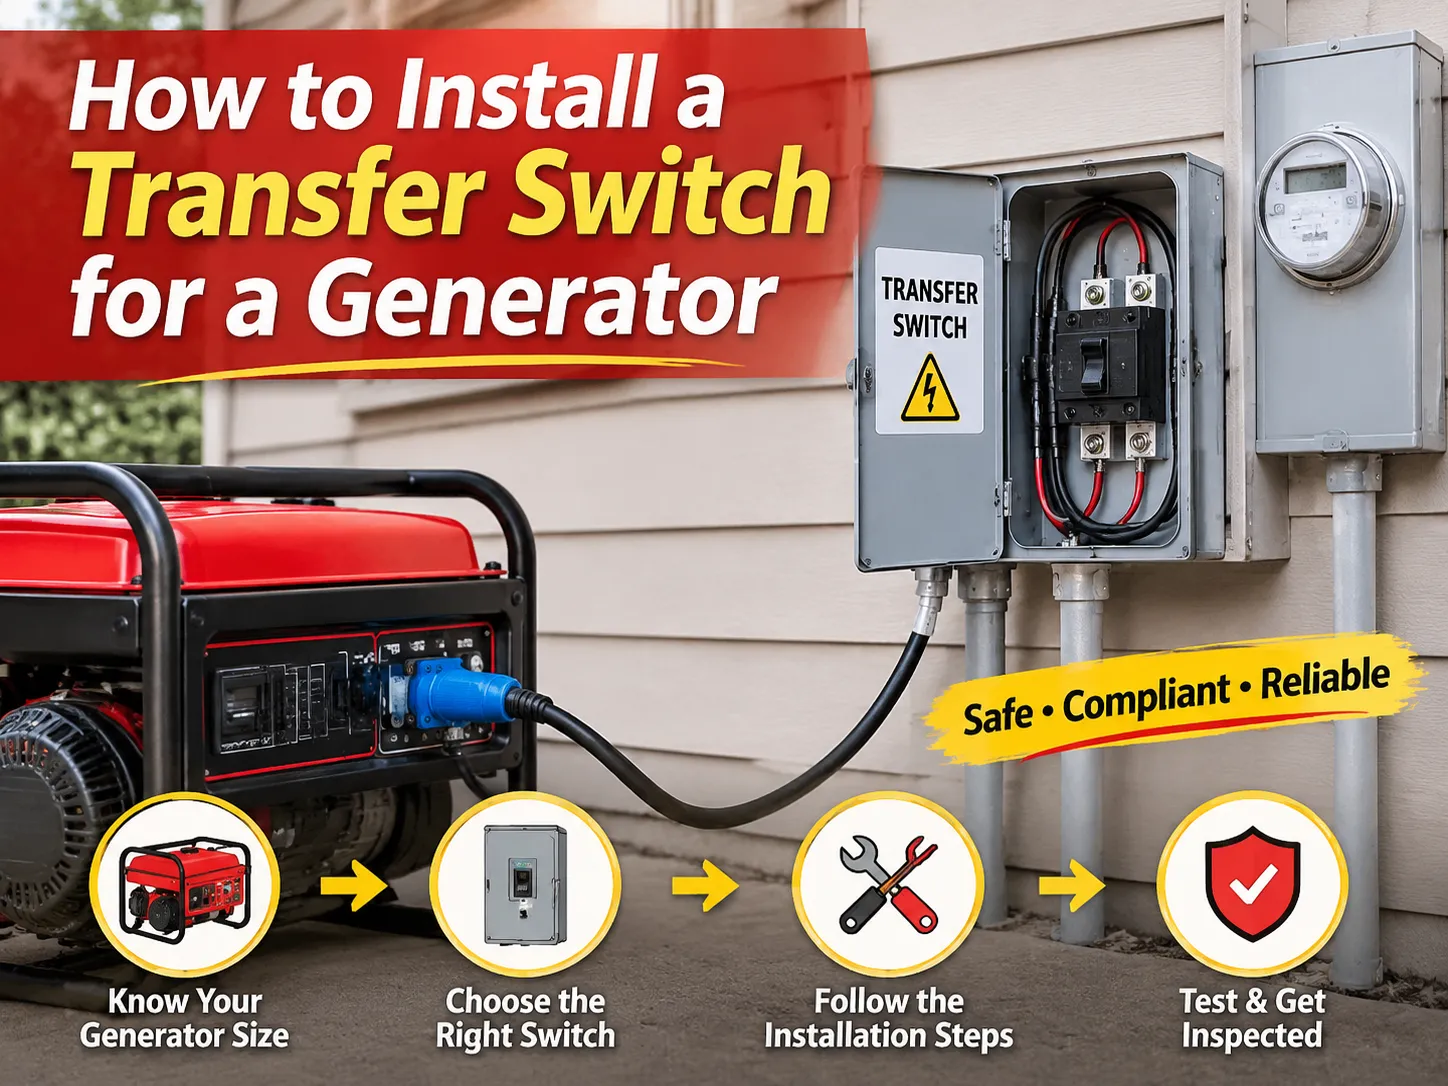
Каждую зиму есть кто-то в неотапливаемом доме, кто смотрит на панель, бросает взгляд на генератор в гараже и задаётся вопросом, достаточно ли будет, если он возьмёт кабель и два зажима-крокодила. Этого недостаточно, и оправданием этому не являются документы. Причина в том, что обратная подача питания на панель создаёт напряжение от генератора на стороне пользователя установки, что может привести к встрече с электриком, прибывающим для восстановления сети. Именно поэтому существует переключатель передачи, и почему установка вращается вокруг одного основного вопроса: как обеспечить, чтобы сторона пользователя генератора и сеть никогда физически не соединялись, и как это установить.
Набор требований, приведённых ниже, основан на предположении, что рассматриваемая цепь является однофазной цепью, которая работает в Северной Америке и использует переносной или резервный генератор. Последовательность вполне осознанна; процесс выбора размера — первый шаг, так как он влияет на все последующие действия, затем переходят к механическим работам, а затем к проводникам, нейтрали и заземлению, что неожиданно оказывается важными решениями, которые удивительно многие оставляют на усмотрение инспектора.
Переключатель передачи должен иметь номинал, равный или превышающий выходную мощность вашего генератора, и должен содержать проводку соответствующего размера для этого номинала, а также быть установлен таким образом, чтобы токи питания от коммунальной сети и токи генератора не объединялись в одной точке. Например, переносной генератор мощностью 10 000 Вт будет выдавать примерно 41,7 А при 240 В, поэтому рекомендуется приобрести переключатель на 50 А и медную проводку 6 AWG. Стоимость оборудования в случае предварительно подключённых ручных переключателей варьируется между $400 и $800, в то время как лицензированный комплект блокировки может стоить от $50 до $150. Дополнительные расходы включают работу электриков, которая оценивается в $300–$600, и разрешения. Установка может быть разделена на четыре механические операции и три электрические: выбор цепей, установка переключателя, установка вводной коробки и протяжка кабелей, подключение питания от коммунальной сети и генератора после проведения теста. Раздел о нейтрали следует прочитать первым, так как он представляет собой место, где соображения, связанные с этой работой, чаще всего оказываются ошибочными.
Какой переключатель передачи вам действительно нужен
Выделено четыре типа устройств, которые считаются переключателями передачи, и они не могут использоваться взаимозаменяемо. Ваш выбор здесь будет зависеть от того, есть ли у вас переносной или стационарный генератор, будет ли кто-то дома во время отключения питания и от размера дома, который необходимо запитать.
| Продукт | Стоимость оборудования | Что оно делает | Подходит |
|---|---|---|---|
| Ручной переключатель передачи (MTS) | $400 до $800 | Предварительно подключённая подпанель с 6–16 ответвительными цепями и двухпозиционным механизмом, который переключается вручную | Переносные генераторы, владельцы, присутствующие во время отключений |
| Автоматический переключатель (ATS) | $400 до $2,500 | Обнаруживает потерю питания от коммунальной сети, запускает генератор, переключает нагрузку, возвращает и охлаждается при восстановлении питания | Резервные генераторы с двухпроводным контроллером запуска |
| Комплект блокировки | $50 до $150 | Сертифицированная скользящая пластина, которая предотвращает одновременное включение автоматов главного и генератора | Современные панели с двумя свободными соседними слотами, покрытие всего дома |
| Вводная коробка и комплект кабеля | $100 до $300 | Влагозащищённая точка подключения на наружной стене, плюс кабель к генератору | Каждая переносная установка, вместе с одной из вышеуказанных |
В отличие от электрического устройства, переключатель должен быть подпанелью, и это различие должно быть указано на счётчике. Он поставляется со своими автоматами, комплектом заводских проводов, и установщик перенесёт подходящие ответвления с главной панели на него. Ручной переключатель класса PC показывает конструкцию: две взаимоблокируемые позиции размыкания, общий корпус и клеммная ёмкость как для электросети, так и для генератора. Комплект блокировки выполняет противоположную функцию. Он действительно не добавляет ничего к количеству цепей — он просто делает панель безопасной, поэтому он так хорошо работает в доме, где генератор достаточно мощный, чтобы запитать всё.
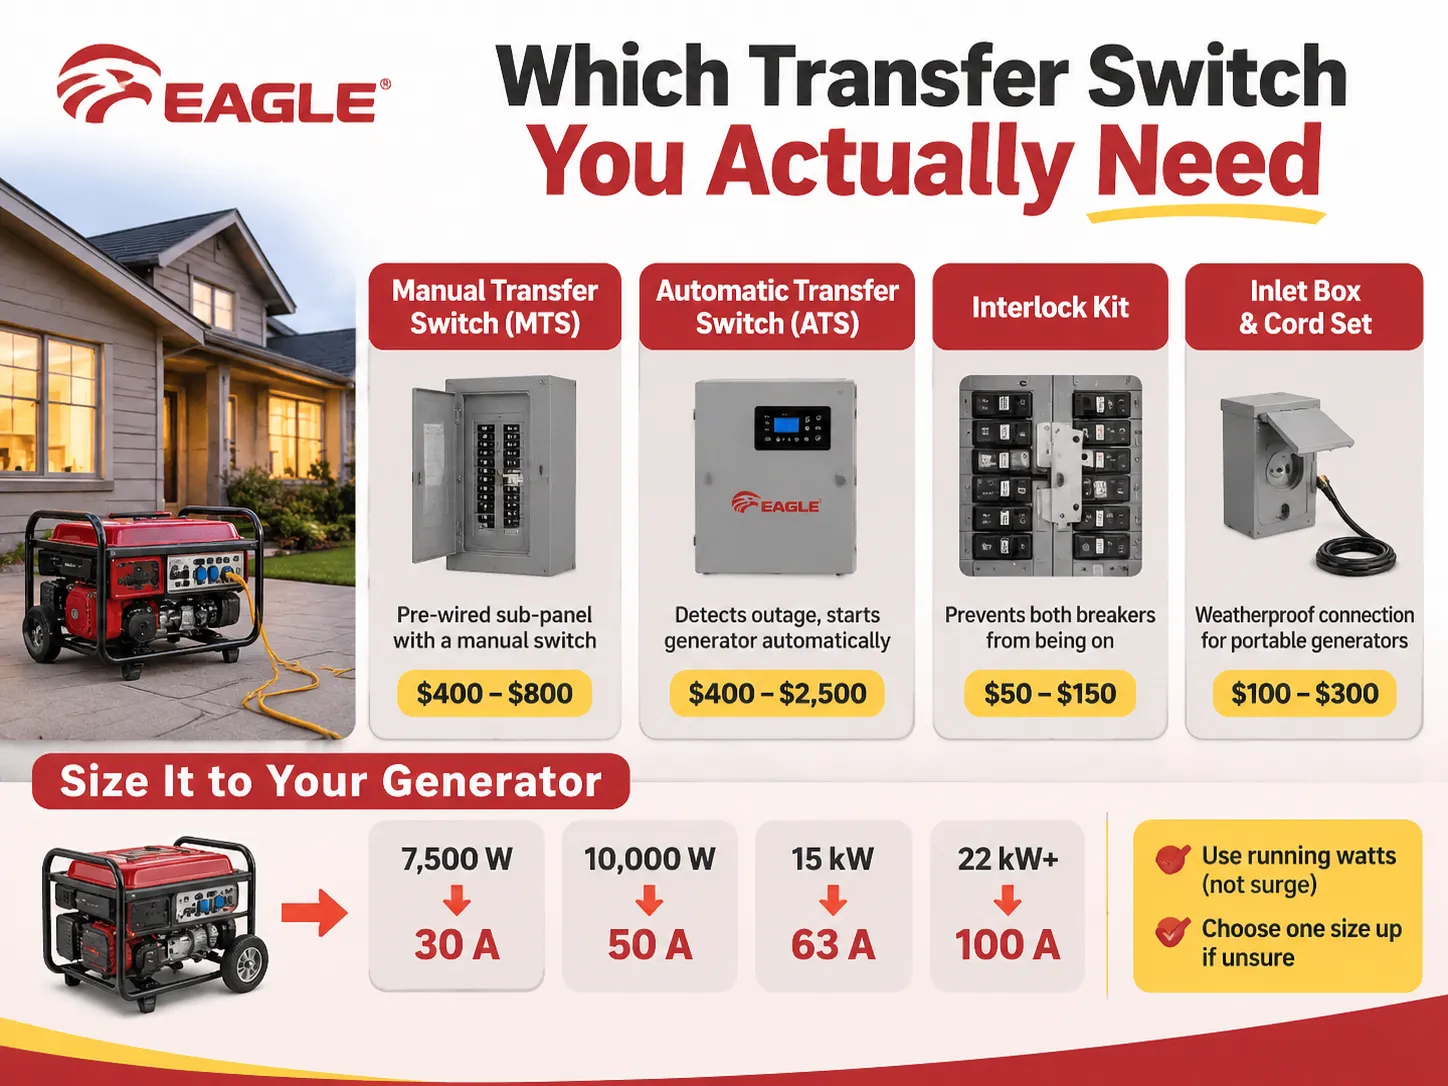
Подбор переключателя по генератору, а не по панели
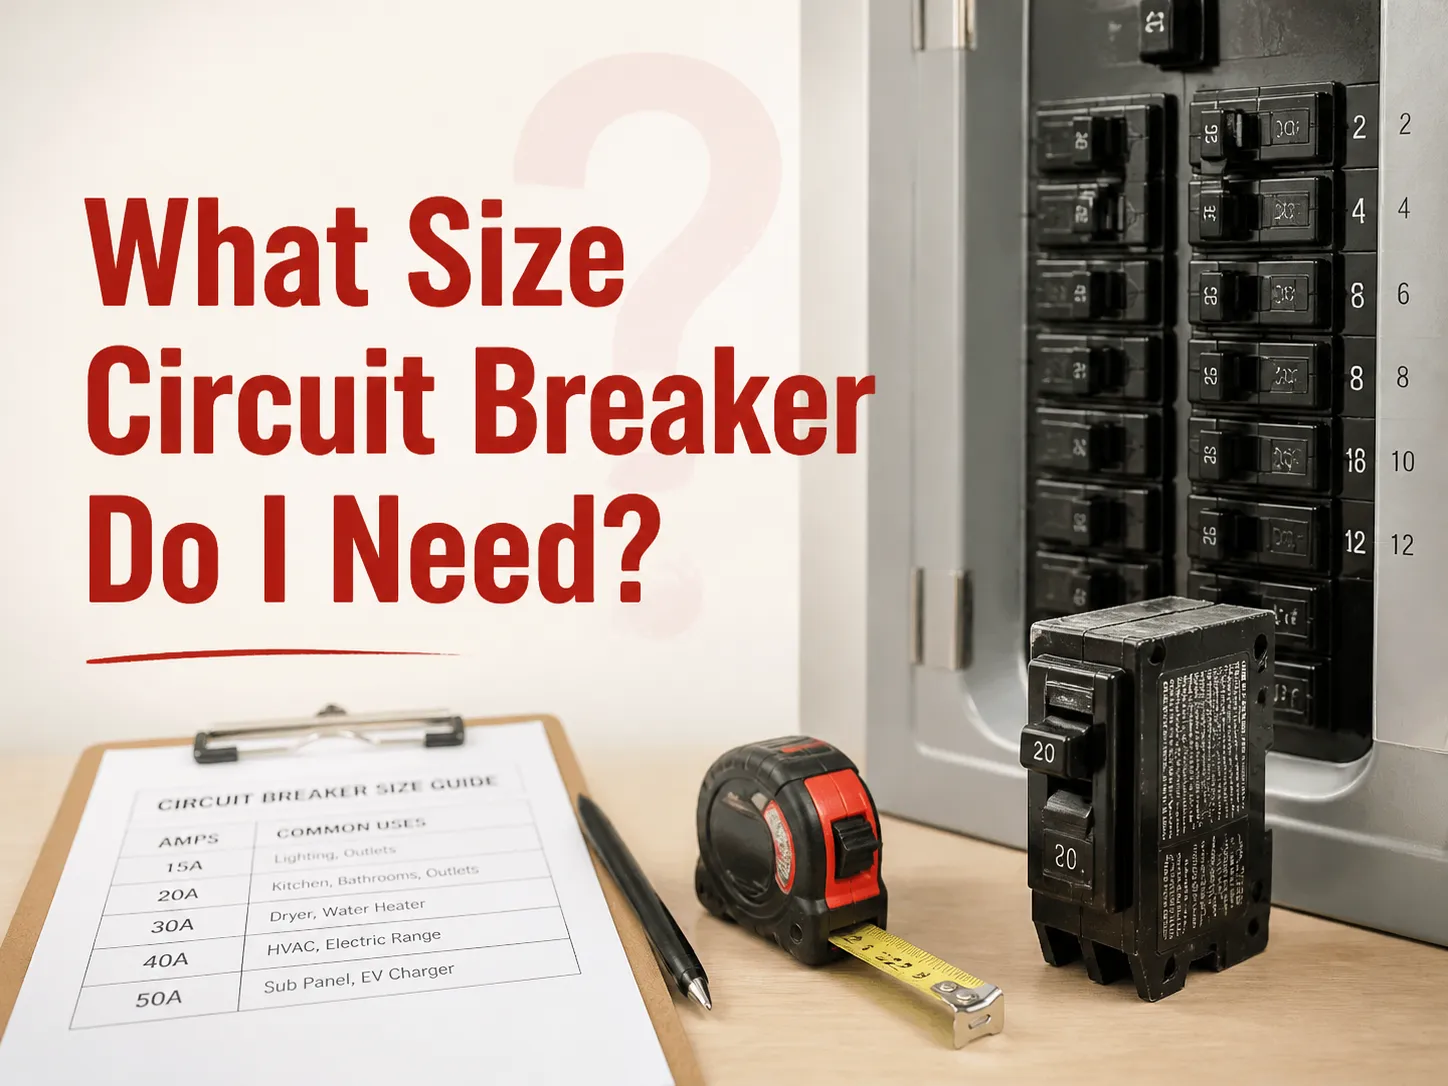
Номинал по току определяется делением непрерывной мощности генератора на 240 вольт. Машина мощностью 10 кВт даёт 41,7 А, что соответствует переключателю на 50 А. Генератор 7,5 кВт даёт 31,3 А для переключателя на 30 А, а генератор 12 кВт даёт ровно 50 А, что является верхним пределом популярных переносных устройств.
При расчёте тока используйте два правила: используются рабочие ватты, а не пиковые, так как переключатель рассчитан на непрерывную нагрузку. Никогда не занижайте номинал переключателя, так как переключатель на 30 А для генератора на 50 А ограничит выход генератора, делая догадки о работе генератора излишними. Выбор переключателя с более высоким номиналом не причинит вреда; однако выбор с более низким номиналом противоречит здравому смыслу.
Выше переносного диапазона арифметика меняется. Устройство на 15 кВт требует переключатель на 63 А при 240 В, что соответствует диапазону, где находится автоматический переключатель на 63 А а резервный генератор на 22 кВт для всего дома переходит на переключатель с номиналом 100 А для сервисного ввода. После этого переключатель рассчитывается по сервису, а не по машине, так как он устанавливается между счётчиком и главной панелью.
Инструменты и материалы перед началом работы
Инструменты обычные, за исключением одного. Требуется динамометрическая отвёртка. Значение крутящего момента указано на клеммах автоматов и переключателей, и обычно ослабленная клемма вызывает отказ спустя некоторое время.
В вашем наборе инструментов также должны быть изолированные отвертки с квадратным приводом, стрипперы для проводов с номиналом 6 AWG, динамометрическая отвертка в дюйм-фунтах, двухполюсный тестер напряжения (помните, что неоновая отвертка не является тестером), бесконтактный индикатор напряжения, протяжка для проводов, дрель с пилами для сверления стены и телефон для фотографирования до и после работы. Фотографии нельзя рассматривать просто как изображения. Они служат доказательством правильного заземления и соединения при установке покрытия.
Материалы: переключатель, вводная коробка с рейтингом NEMA 3R на случай установки снаружи, четыре провода регулируемого сечения, труба и фитинги, двухполюсный автоматический выключатель для электроснабжения, герметик для наружных работ, маркировочные этикетки, кабель генератора достаточной длины. Комплекты обычно поставляются с кабелем длиной 10 футов, что оказывается слишком коротким, учитывая, что генератор установлен далеко от дома, а выхлоп направлен в противоположную сторону.
Шаги 1–4: Разрешение, Отключение, Цепи и Монтаж
- Шаг 1. Получите разрешение заранее. Почти все муниципалитеты требуют получить разрешение на электромонтажные работы вместе с инспекцией переключателя, которая обычно стоит от 150 до 300 долларов. Получить разрешение до начала работ выгоднее, чем после их завершения. В некоторых юрисдикциях инспекции не могут быть назначены задним числом.
- Шаг 2. Отключите и проверьте. Сначала выключите главный автоматический выключатель. Затем используйте двухполюсный тестер для проверки клемм. Тестирование в панели при выключенном главном выключателе показывает состояние главного выключателя, но не гарантирует безопасность клемм в случае неисправности главного выключателя или наличия другого источника питания.
- Шаг 3. Выберите цепи. При использовании ручного переключателя можно подключить около 5–16 цепей. Необходимо составить точный список, включающий только те устройства, которые должны быть подключены во время работы. Считайте два потребителя, если они работают на 240 В. Не включайте плиту и сушилку, так как переносные генераторы не могут обеспечить их работу.
- Шаг 4. Установите переключатель. Его нужно расположить рядом с главным щитом, чтобы длина трубопроводов была минимальной. Недостаток места под корпусом или неправильная длина проводов являются нарушением норм, требующим дополнительного решения. Переключатель также должен быть установлен ровно.
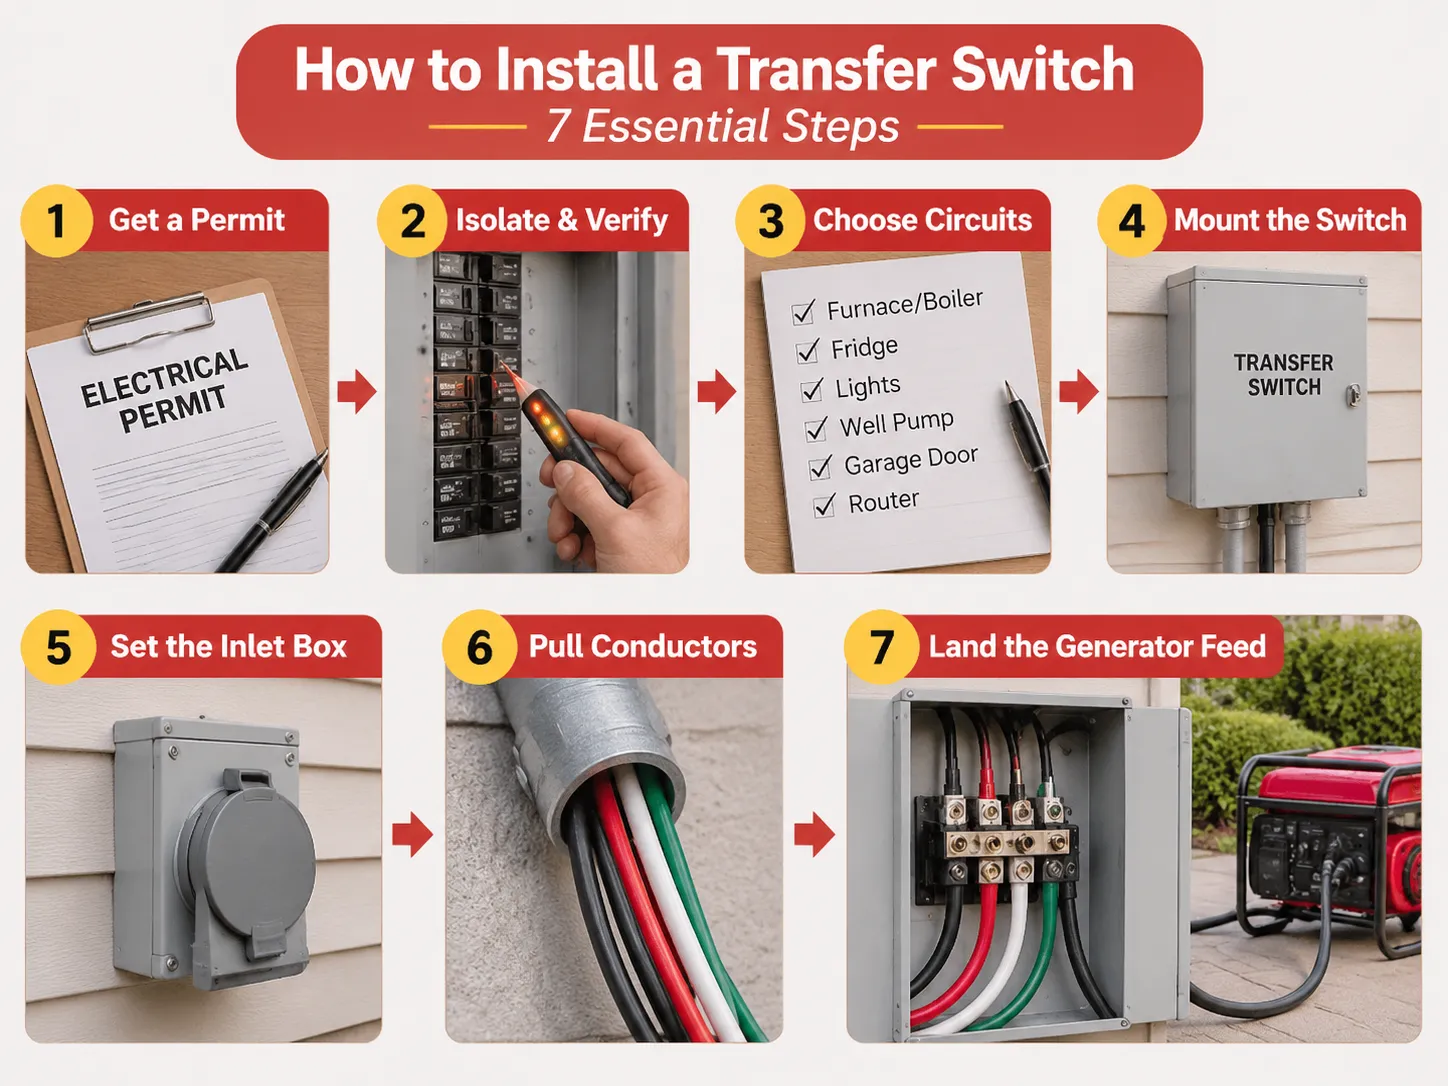
Шаги 5–7: Труба, Проводники и Вводная Коробка
- Шаг 5. Закрепите вводную коробку на месте. Коробка должна быть установлена на наружной стене, недалеко от места установки генератора. Высота должна быть выбрана так, чтобы на кабеле не скапливался снег или стояла вода. Ввод NEMA 14-50R обеспечивает два фазных провода, один нейтральный и один заземляющий провод. Другой распространённый тип ввода — CS6375, выбор зависит от вилки генератора. Неправильный выбор приведёт к необходимости покупки другой вводной коробки или адаптера. В любом случае адаптеры на 50 А не рекомендуются для влажной среды.
- Шаг 6. Протяните проводники. Для системы на 50 А требуются четыре медных проводника 6 AWG: один черный, один красный, один белый и один зеленый. Медные проводники 6 AWG могут безопасно проводить ток 65 А при температуре 75 °C. Следовательно, можно сказать, что падение напряжения на проводнике при длине 50 футов составляет примерно 2 %, что находится в пределах допустимого падения напряжения 3 % на линии питания. Кабель NM-B не может использоваться внутри наружного короба или во влажной зоне, поэтому в трубопроводе необходимо использовать кабели THHN или XHHW. Размер трубопровода должен соответствовать количеству используемых проводников, обеспечивая легкость протяжки.
- Step 7. Land the generator feed from the generator to the hot bar. The generator feed making the hot, neutral and ground connections. Once these connections have been made, conduct the utilities connection from the two-pole breaker in the main panel. The two connections should be kept separated in the enclosure. The conductors should be dressed to avoid crossing of moving contacts.
Wiring the Switch: Utility Side, Generator Side, and the Breaker That Feeds It
The utility side comes from a new two-pole breaker in the main panel, sized to the switch rating. For a 50 A switch that is a 50 A two-pole breaker, and a standard thermal-magnetic device of the kind in this 63 A miniature circuit breaker range is what the circuit expects: 6 kA or 10 kA interrupting capacity, C curve for mixed loads, and a torque value that has to be honoured on both lugs.
The generator-side voltage-derived comes into the inlet box. Within a manual switch, there are two breaker positions for each branch circuit: one fed from the utility bus and the other, in turn, fed from the generator bus. And the mechanism ensures that only one bus is energized at any time. This is the whole trick, and it is mechanical-as opposed to electronic-in nature. There’s no way to bypass it with a software bug or a stuck relay.
Within an automatic switch, the logic is contrary. A controller would monitor both sources, start the generator, wait for the frequencies and voltages to stabilize, and then activate the motor-operated mechanism. This transfer is temporarily delayed for two reasons: first, an accelerating generator produces low voltage at low frequency, and closing onto a load at this time causes failure of compressor motors; second, a changeover is put on hold for a second reason, which lies in order that the utility can settle down before handing back the house.
The Neutral Question That Fails More Inspections Than Anything Else
There are two valid ways to manage the neutral, and making the incorrect choice will lead to either shock risks or nuisance trips.
- Solid neutral, non-separately derived. The neutral of the generator and that of the utility are linked at the switch, while the generator frame remains bonded as part of the same grounding system. In this configuration, the generator’s neutral has to be unbonded from the frame, as the presence of two separate bonds in the system results in neutral current going through the ground conductors. That is the most common setup for portable generators feeding an isolation switch.
- Switched neutral, separately derived. When the switch disconnects the neutral together with hots, the generator becomes a separately derived system, and the neutral is bonded either at the generator or switch while having the grounding electrode conductor going to the grounding system of the building. This arrangement is used in much larger stationary setups and for switches rated for the service.
- The failure mode assumes the use of a portable generator with a bonded neutral in a solid neutral switch. In that case, it results in parallel neutral paths, ground current, and nuisance tripping of GFCI devices every time the generator is on. Look for the instructions that specify whether the generator neutral is bonded, examine the switch instructions for the arrangement suitable for this case, and note what you’ve found. If the two instructions contradict each other, you’ll have to do something minor yet specific to fix this issue.
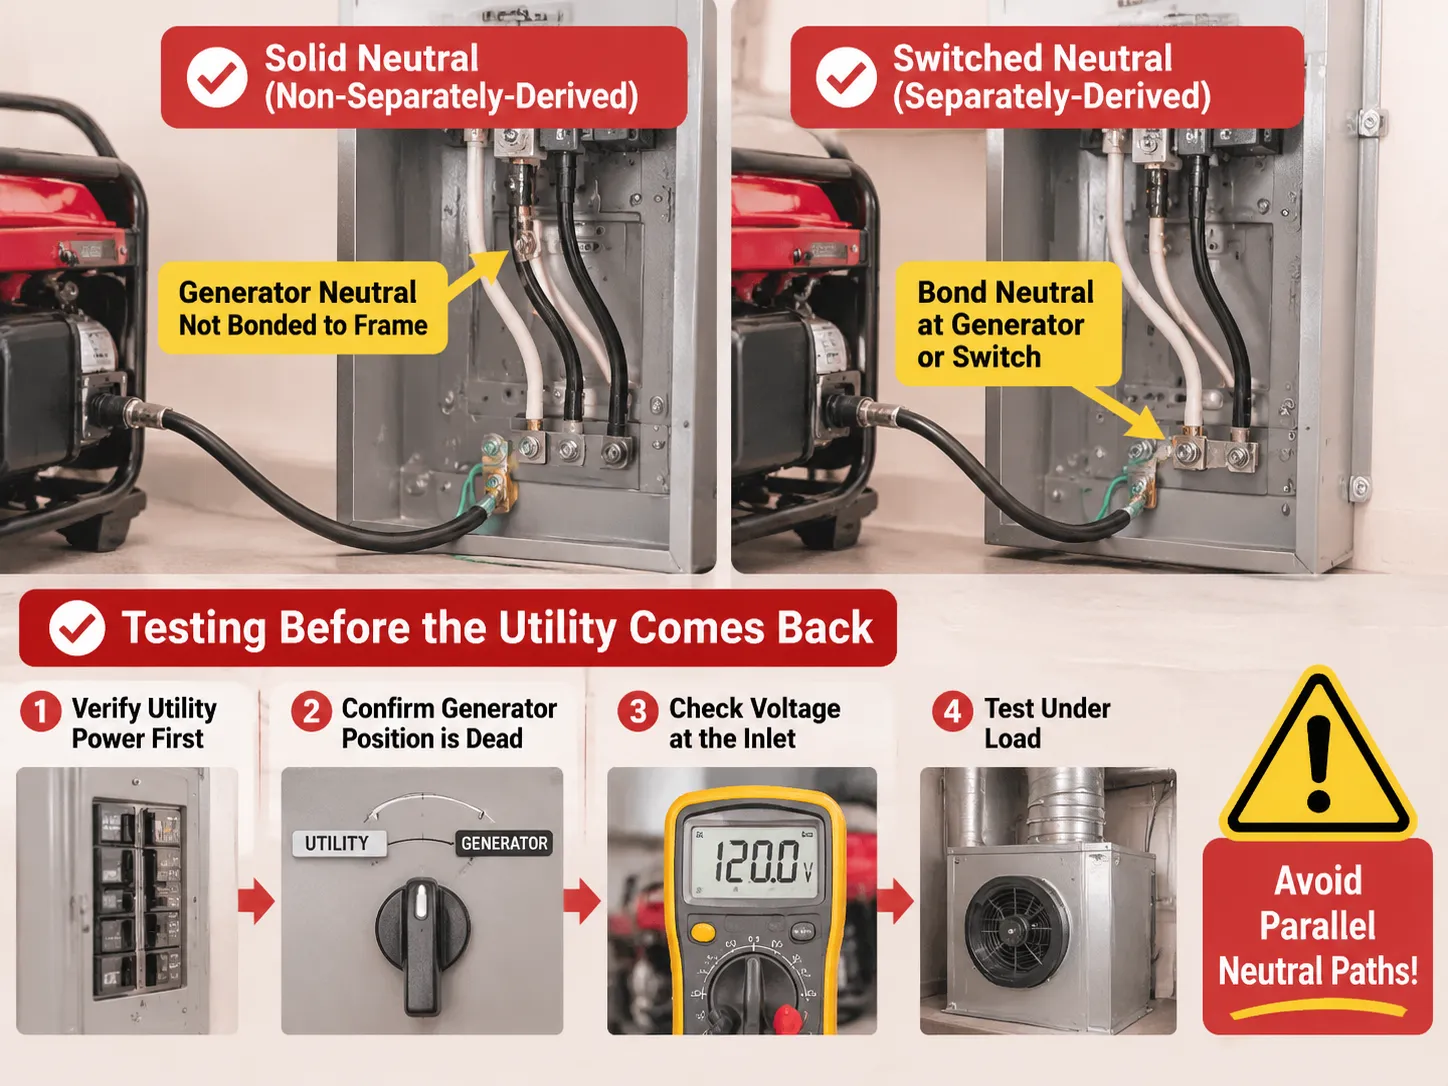
Testing Before the Utility Comes Back
To ensure your safety while testing, you should start with resetting the generator by disconnecting it from the system and then checking power on the utility panel. This will show whether there is any voltage present on circuits being backed up. Following that, plug the generator in and see if there is no power in the same circuits.
After that, you will have to start the generator outside, then connect the cord and check voltage before switching on the generator. You should expect reading of 240V between the two hot phases, 120V on hot vs neutral and 120V on hot vs ground. When the neutral is missing, you will read 120V on hot vs ground and some strange voltage on hot vs neutral.
After that you have to switch to the generator and start checking the loads on circuits one by one from the highest power draw unit in each of the circuits. The best way to test the system would be to start a furnace fan. The key point here is taking the voltage when all the load is connected.
What the Job Actually Costs
The cost of the hardware for a 10-circuit manual transfer switch with an inlet and cable ranges from $500 to $900. In an installation of a manual transfer switch that has been prewired, the labor customary to be about from 2 to 4 hours, which will be costing roughly around $300 to $600. Adding the cost of the permit will bring the total to around $850 to $1,800 for the simplest of installations.
Interlock kits are relatively cheaper as compared to the previous options. The cost of interlock kits is from $50 to $150 and that of the electrician is about $150 to $400 as the task involves placing only one circuit breaker and a faceplate. You can also find expensive automatic whole house switches that may cost you $800 to $2,500 as the switch alone will take a longer period to install. For scale at the larger end, the pricing structure on a 600 A four-pole service entrance automatic transfer switch shows how quickly switchgear pricing moves once the device becomes service-rated.
Mistakes That Get Installations Redone
Double male cord. Using a cord with both ends being a male plug to connect generator to dryer outlet is the most hazardous shortcut in the industry. It backfeeds the panel and energizes service conductors, which may kill utility personnel or damage the generator when the grid goes back online. In addition to this, it is against code everywhere, and no inspector will let it go.
Undersized conductors. A 50 A switch fed using 10 AWG wire simply because it happens to be available on the truck. Even though the breaker does its job, the wire overheats, and the failure can take place months later.
Generator placed too close to the house. The total number of fatalities due to carbon monoxide poisoning in America reaches about 100 each year, and nearly 80% of those happen in domestic settings. So, the generator must be kept outside, at a considerable distance from the doors and windows, exhaust pointing away from the house and a battery-powered CO alarm operating on all floors.
No load calculation. When the generator is connected to a switch with many circuits that cannot be supported by the generator, the breaker will trip at the first cold night. So, the watts for all devices must be calculated to avoid any problem.
Unmarked circuits. A panel directory made with a pencil and never updated can create a problem during the blackout that happens in the middle of the night. It is recommended to print the panel directory so there is a copy available when needed.
Manual or Automatic: Which One Belongs in Your House
Manual switches are based on the premise that the individual is in the house, awake, and able to venture out into inclement weather. This is acceptable for most homes and outages, which last hours rather than days. However, manual switches fail houses with wet basements containing a sump pump, people with medical conditions, or an owner on the move.
On the other hand, automatic switches operate on the understanding that a generator is permanently installed and supplied with a start signal, has been provided with enough fuel to run for several days, and has a functioning exercise regimen. The 100 A automatic transfer switch is the size band that suits a service-rated residential installation, with adjustable transfer and retransfer delays so the generator is not asked to accept load before it is ready.The trade is legit: an ATS costs about 2 to 4 times more than a manual switch plus required equipment like a battery, controller and yearly service costs. In exchange you get lights without needing to leave bed.
A practical way could help reduce costs. You could set a large manual switch and leave space in the box for a controller later on. Panel and input costs are usually high, and it is easy to change a mechanism later.
Часто задаваемые вопросы
Can I install a generator transfer switch myself?
In various localities it is possible for a resident to apply for an electrical permit for installation on their personal single-family house and perform the necessary work pending inspection. It is the conditions that are important rather than the permission: the panel should be turned off, the wires should be of adequate size, the neutral connection should correspond to the one on the generator, and the installation should be performed properly. If anything in those four requirements is questionable, then the answer should be ‘no’. Interlocking kits are the easiest choice for DIY enthusiasts, but still need to be certified and compatible with the given model of the electrical panel.
How much does it cost to put in a generator transfer switch?
If you’re purchasing a hard-wired 10-circuit manual switch, your hardware expenses will generally fall in the range of $400 to $800, while installation by an electrician will run between $300 and $600. Permits will often cost from $50 to $300, for a total installed cost of between approximately $850 and $1,800. Interlock kits run from $50 to $150 in parts and from $150 to $400 for installation. A whole-house automatic switching mechanism for the use of a standby generator runs from $800 to $2,500, with the actual cost of installing such a switch higher, since service conductors and wiring for the control of the generator are necessary. An inlet box and a long enough cord often add about $100 to $300 to the installation estimate, but are sometimes left out.
Can a homeowner install a generator transfer switch?
Often, the permit is the determining aspect, and not really the talent. Some municipal building departments allow owner-permit electrical work on an owner-occupied single-family dwelling and with the inspection; a very few require a licensed electrician to do anything that is considered to take place inside of the service panel. Be sure to call the authority having jurisdiction before you buy anything hardware-wise, since that is going to change the picture entirely. Note as well that the unpermitted installation could be enough for the insurer to deny a fire claim which is in fact much larger than the amount you saved on labour.
What size transfer switch do I need for a 10,000 watt generator?
The switch is rated for 50 A. The calculation of operating wattage divided by 240 V yields the result of 10,000 ÷ 240, which is 41.7 A. The next standard size switch is, therefore, 50 A. Only operating wattage should be considered and not starting wattage since a switch operates continuously on the same current. A 50 A switch requires six AWG wires made of copper material and a double pole 50 A breaker on the utility side. If the generator outlet is 30 A L14-30 versus 50 A 14-50 then both switch and inlet have to match the outlet and the generator will be limited by the socket.
Do I need a transfer switch if I only use extension cords?
No, and that is the only legally permissible option. Instead of wiring the generator into your house system, extension cords are used to connect the generator with an appliance, thus making the generator independent of the house wiring which prevents any backfeed. This means convenience and safety: runners through the doors, no fixed electrical loads such as contacting pumps or a furnace, and clogged path with obstacles in the dark. The minute you need to use electricity in a fixed installation, you must use a transfer device according to NECA702.
Ссылки
- Electrical Engineering Portal — Installing a Manual Transfer Switch
- NFPA — National Electrical Code, Article 702 Optional Standby Systems
- Generac — Home Standby and Transfer Switch Products
- Reliance Controls — Manual Transfer Switch and Inlet Box Systems
- ASCO Power Technologies — Automatic Transfer Switch Engineering
Заключение
Installing the generator system is easy. The tough part is deciding. Size from running watts, keep switched and inlet matched to generator output and establish the neutral before pulling the first wire because that’s what fails inspection and puts current where it should not go.
Then buy hardware only once. A switch rated one size above your generator will cost only a bit more and will never let you down; a switch that is rated one size below will ruin the generator you already have. If you tell us what your generator’s continuous rating is, its outlet and whether or not its neutral is bonded we will tell you which board and which pole configuration you need for the job.